 I had
several questions on the candle that was part of my fall set (class is Sat September 30 - I'll need an RSVP by Friday morning very latest.
I
bought mine at the Dollar Store for $1.
Here's another photo without the flickering light.
Stamp
the leaf images on
tissue paper on the smooth side.
Cut
out the image – not super close but not too much overhang.
Place
on your candle
making sure the inked side is on the candle
Cover
the tissue with wax paper (so the candle
is wrapped all the way round so it’s easy to hold the candle and the wax
paper), the wax paper will be firmly against the candle.
With the
heat tool, heat the stamped image and the wax paper covering it. Don’t burn it or melt the candle!! Be careful the heat tool is hot! then slowly peel off the wax paper and make sure you have melted the tissue paper and inked images onto the candle. You can re-wrap the candle in the wax paper if you need more heat.
 You
can use real wax candles, or my example uses an LED candle from the Dollar
Store $1 with a waxy finish.. It works great, but don’t over heat it… it’s only
$1 and doesn’t have that much wax!
A few
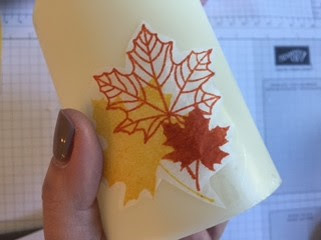
mistakes… first I love the look of the many leaves on this one.
However, I didn’t do a great job of trimming
the tissue close to the
leaves – see how the tissue shows?
Also I didn’t wrap my candle tightly and so the tissue wrinkled.
Anyway, I still
like it but thought seeing a few mistakes might give you some tips
Stay
tuned for our Big Holiday Crafting Event Oct 14 in Pittsfield ME and also I’ll
have 12 days of Holiday Crafting Oct 1-12 on my blog.
I’d
be grateful for an order with the host code (top right corner of this page… and
you’d share in the customer goodie boxes. Last month it was Emerald Envy Ribbon
and Cherry Cobbler twine –
happy stamping, MaryKate


No comments:
Post a Comment