Tuesday, September 29, 2020

Double Triangle Cards in Warm Hugs Paper

 I have a fun double-triangle card for you - perfect if you have some smaller pieces of patterned paper!


You can find a video here with how-to's and tips and ideas on stamp sets that work well with the design.


Click here to see the 5 min video


Dimensions:

Real Red cardstock (back) 1/4 sheet of cardstock 4 1/4 x 5 1/2

Whisper White 4 x 5 1/4

Designer paper triangles are 3 x 4" folded into a triangle, the 1" flap is secured to the back of the Whisper White cardstock.

The front panel can be any nested dies (larger is better), I used dies from Hippo Happiness.


Tip: I like to stamp a little texture on the top and bottom of the white card to remind me not to write too big a greeting!


Don't forget that our designer paper sale starts Oct 1st right here in my online store, many patterned paper packs are 15% off!


Thank you for shopping with me, I appreciate you and love sending you thank you gifts for your order!


Happy stamping, MaryKate


Wednesday, September 23, 2020

A really big gift bag with Warm Hugs designer paper

My amazing team leader Suzie Barnes designed this "Big Bag".  I love it!  


It finished at 7 1/2" high and has a depth of 3", so it holds a lot.

Ingredients: 2 sheets Mossy Meadow 8 ½ x 9 ½ scored (on the 8 ½ at 5 and 8) and (on the 9 ½ at 7), 24” of ribbon, 12” of gold cord, DSP 2x5”


Burnish score lines with a bone folder.  Trim the tabs at the bottom of the bag. Attach the 2 pieces together on the 9 1/2 side so you end up with a long 16 1/2 piece (by 9 1/2).  Now attach the other side to make a box. Close the bottom.  


Adhesive, I suggest tear n tape or the new Seal+ both are strong adhesives.


Decorate your bag by first attaching your DSP (designer series paper) and then punching holes for the ribbon.  I used the matching Mossy Meadow ribbon. Attach a tag. 


I hope you make one!  I know you have cardstock and pretty paper and ribbon in your stash.  So it's a fun easy and practical!  And if you anything, my online store is a click away (just click on the cart), fun customer rewards this month :)


Thanks Suzie for all you do for our team. We have a coast-coast team and are so lucky to get great support and training. If you'd like to join us, please reach out and I can answer any questions - and gives you the chance to get to know me and the team.  There's a good offer now, as the starter kit (choose $125, pay $99) also includes 2 kits (2 stamp sets and 16 kit cards) for September 2020. If you love kits, like Paper Pumpkin, or love getting a 20% discount on all your SU crafting supplies, this is for you.  


You can reach me on MaryKate@MaryKateScott.com


Happy crafting, MaryKate


Tuesday, September 22, 2020

Zany Wobbling Zebras

 The Zebra set is in our Beginner catalog so it's a bit hard to find. It's so cute, perfect if you love to color, or not.  I kept my card black and white.  


Can you see the wobble under the Zebra above?  

What is most fun about this card is the "wobble", this is a small plastic gadget (you can get them anywhere, e.g., Amazon), you search 

Hampton Art AWSM048 Action Mini Wobble Spring, they are about 30c each and they make the image wobble.


The wobble is underneath the zebra on the left, so it is really kicking up its heels!   This card was designed by Betsy Lang, so fun. Thank you Betsy.

The inside has another zebra and a "wild about you" greeting.  

ZANY ZEBRAS CLING STAMP SET

Front dimensions:  4 squares in order 3 1/2, 3 1/4, 2 3/4, 2 5/8 (white).  The smaller squares in each corner finish as 1 3/4 square.  

Will you color yours or leave it black and white!?  And if you are looking for the bundle of products here they are at $59 - this would be a fun gift!

ZANY ZEBRAS PROJECT COLLECTION

happy stamping MaryKate

Monday, September 21, 2020

Stamp Sale coming... Sept 23...15% off select stamps

We just got word a stamp sale is coming on Sept 23! 15% of select stamp sets.  I have the list and will send it out later today by email. It's only 24 hours!


Lots of fun sets to play with on this list!  

Happy Shopping, 

MaryKate

Poinsettia Autumn Card holder

This card holder can easily hold 4 full size cards and 4 envelopes.  When selecting paper for this project, find heavier weight designer paper or use cardstock. I used Thick Very Vanilla and Poinsettia paper. I used vanilla ribbon from the annual catalog.


Card Holder instructions

To make the card holder, cut the cardstock 8 ½ x 10 and on the 10” side score at 4 3/4, and 5 ¼. 

One the 8 ½ side score at 2 ¼ and 2 ½.    

With the 1” piece left over, make the “gusset” pieces: cut 2 pieces 1 x 2 ¾ and score each at 1, and 1 1/4.  

Trim your holder removing the middle piece measuring 1/2 x 2 1/2 and burnish your folds.

Add the 2 gussets, first to the bottom and then attach to the folder (so they won’t show). 

Decorate the front with designer paper 4 ¼ x 5 ½. If you wish, wrap about 24” of ribbon around the front and tie in a bow.  Put your dimensionals at the top and the bottom of the square so the ribbon runs freely.

Inside the designer paper is 4 ¼ x 1 ¾ on each side if you wish.

Here are the cards


I used the gold card bases and added die cuts from the Poinsettia dies in vanilla, the wood-look paper is also from this Poinsettia paper pack.  

The real-red sheer ribbon really adds to this card. The greeting is from the Buffet Tag set.  

I love the beaded gems that go in the center of the flower petals... so pretty!  

I hope you make the holder and these cards, they are pretty and so easy!

Happy stamping MaryKate

Friday, September 18, 2020

Easy way to make a diorama card with Trimming the Town

We have had fun making these diorama cards.  Perfect for holiday - you can easily insert a photo on the back wall.  


Here's a diorama card with just designer paper and a greeting from the Buffet Tag kit.  


click here for a short video with great tips to easily make this card


The paper is from "Trimming the Town" in the Stampin UP Holiday catalog (just click on the cart and you can browse).


This card looks hard, but I promise you my video shows you how to create this very easily.  It folds flat, goes into a regular envelope.  So fun.


I hope you try it!

Happy stamping MaryKate 


Happy anniversary to us!

Nothing crafty today.... just a personal share.

It's 10 years today ... I'm so lucky to be Mrs Charlie xo


Thursday, September 17, 2020

Trimming the Town Scene or Tableau Card

 This is an easy fun fold - perfect for when your designer paper has a scene or tableau (vs a repeating pattern).  Other Stampin Up designer paper that offers "scenes" include the Feels like Frost paper or the Whale paper.


This one uses Trimming the Town, I love these snowy tableau.  

Dimensions:    Base:    8 ½ x 5 ½ score at 1 ½ and 4 ¼, The DSP is cut 5 ¼ x 5 ¾ now cut into 3 panels: panel 1 is 2 ¼ wide, panel 2 is 1 ½ wide and panel 3 is 2” wide.  Ribbon 24”  2 circles, one is 2 1/4, the other is 2" I used punches but layering circle dies work fine.

Tips

Once your card is folded in half, fold it back for the front.
Now tie the ribbon to the front of the card. This is important to do before you adhere the designer paper.

Lay out your 3 pieces of designer paper - they are different widths so this is easy.  Large, small, medium, in this order

Now put your front piece on - tip - line up the top left corner of the designer paper with the top left corner of the cardstock.  NOT the right hand corner - this is the most common mistake.  

Put adhesive on the CARDSTOCK (front of card) NOT the designer paper as some of the back of the paper is not adhered to cardstock.  This is the second most common mistake :)

Now add the middle piece on top of the ribbon, then the last designer piece and then the white piece with a stamped greeting.  Finally add the 2 circles with the greeting.  I used the Buffet Tag stamp set for both greetings.  I featured this on my blog Sept 12.  

Add the circles and greeting. 

This stunning designer paper is available in my online store, just $11.50 for a pack of 12 sheets! As is the cardstock, Misty ribbon and more crafty goodness!

Happy stamping - MaryKate

Wednesday, September 16, 2020

Love you more than Chocolate Mosaic Treat bag

 I held a demonstrator training event over the weekend and one of our projects was to use these fun mosaic bags.  They are $7 for 25 bags and measure 4" wide, about 6" tall, and they are gusseted. 


There are perfect to hold our notecards (7 x 5 folded that finish 3 1/2 x 5")


I added a notecard and a few chocolate treats, then topped it with brushed foil and a greeting from the Buffet Tag set.


I used this fun "Nothing more than" set... Click here to see the dimensions / details on this card


I'll make up my blessing mix and use these bags. Click here for the blessing mix and packaging


I hope you like today's project, if you have questions, need anything, I'm here for you! email me MaryKate@MaryKateScott.com


Happy crafting MaryKate

Tuesday, September 15, 2020

Gilded Autumn Chocolate Clutch bag

 I made this "clutch bag" to hold cards ....but it hold so much more including a full size Lindt chocolate bar!


This one is made in Early Espresso, with the Gilded Autumn Paper and the Brushed Foil for trim.


Dimensions: 7 3/4 x 11, score on the long side 2 , 2 1/2, 7 , 7 1/2. Fold into the clutch.

With the 3/4 strip left over, create 2 gusset pieces 3/4 x 2 1/2, scored at 1, 1 1/2.  Attach these to the sides


Here's a post with a navy/silver look with citrus cards, slightly bigger so modified dimensions.  Click here to see the Navy & Silver Clutch bag and cards


My online store has the paper, foil, stamps and more.. I'd love to be your demonstrator whether it's shopping or joining a class. Check out the events page for online and in person options!


Happy stamping MaryKate


Monday, September 14, 2020

October (Holiday) Paper Pumpkin - details just released

 Every year the October Paper Pumpkin is a Holiday edition.  This year is no exception.  It's a holiday theme with 8 cards. New to Paper Pumpkin? It's a kit of crafting supplies, everything is included: the project supplies, ink, stamps and in your first month a block.  Everything you need is inside the box.


It's reasonably priced - you can buy a single kit for $23 or get a 3, 6 or 12 month subscription and you save $1, $2 or $3 a month.

If you are a subscriber you can pause (choose to not get a specific month). So it's easy, relevant to the season, fun to create with and projects are perfect to send of give to family or friends.

Click this link to purchase your kit

Here are the details for the October kit

  • -Kit contains enough supplies to create eight cards—four each of two designs—and coordinating envelopes.
  • -Kit includes die-cut pieces in English, French, and German. This will allow you to create cards you can use to connect with other customers and demonstrators around the world—in their language! To learn more about how to do this, read the “The Joy of Paper Pumpkin” section on this page.
    • Card size: 4-1/4" x 5-1/2" (10.8 x 14 cm)
    • Envelope size: 4-1/2" x 5-3/4" (11.4 x 14.6 cm)
  • -Coordinating Colors: Cherry Cobbler, Crumb Cake, Early Espresso, Just Jade, Soft Sea Foam (in real words, a deep red, a bright/creamy green, light and dark browns). 

  • You can purchase this in my online store, just click on the cart or Here's a quick link

  • One tip... each year these sell out, and while usually you can order right to the 10th of the month (e.g., 10th of October), I'd think about ordering this earlier than the 10th to be sure not to miss out!

  • Let me know if you have questions, 
  • Happy creating, MaryKate
  • Saturday, September 12, 2020

    The Tag Buffet Kit into Cards

     I love kits...but this tag kit did not catch my eye the first time I opened the catalog.  It makes 30 tags for $30 and honestly I don't need 30 tags, and I'm not sure I want to spend $1 a tag!!


    But this kit makes super fun cards!  These are easy to make.  If you have kids at home, if you like easy projects that have everything included, this is for you.  The kit includes die cuts and tag fronts for 30 cards plus there are 6 extra Christmas trees!  And it includes about 14 yards of gold twine.  

    So here are my cards.  Essentially my base is 4 1/4 x 11, folded in half.  The back and front tags are adhered flat, each at an angle.  I attached the die cut image with dimensions and the stamped greeting flat.

    I attached a bow with a glue dot where the tag has the whole.  Inside I stamped the greeting from the matching stamp set.


    Here's the matching stamp set - see it above

    Tip... reread this image "May the good times...." and think about special anniversaries or family events, this is perfect well beyond Christmas!

    You could stamp some of the leaves, the mistletoe, lots of options.


    For these 2 cards (above), they are the same except on the left, I did some background stamping using "tone on tone" stamping.  I like both, do you have a preference?


    Below you can see the tag made up according to the kit and then the card. So you can see that these are big tags!

    Here's what you get inside the box, I like that they gave us extra pieces to stamp on (just in case!)

    So all in all I think it's great value! We made these at class a week ago and I found that both new stampers and avid-crafters really liked them.  We also made a clutch to match.  Here's a link to the clutch bag with dimensions  The link takes you to a navy clutch which is wider than the one we made so it would hold more cards.


    The tag kit is $30 and the stamp set $18 in my online store. All you need is some cardstock to match (I used Real Red, Shaded Spruce, Just Jade) and Whisper White inside.  Real Red is the only ink you "need" but it's easy to add in some green.  


    And then there's a cute box that you could use for a gift... so fun!


    Happy crafting, MaryKate


    Friday, September 11, 2020

    Merry Moose Foil Card with the Evergreen Embossing Folder

    I think most of you know I live on Great Moose Lake in the summer so when I saw the Moose was returning, you know how happy I was.  In fact I have a Moose punch and stamps in both Maine and my home in Florida!


    This Moose card uses 3 pieces of brushed foil in silver, gold and copper. The paper pack comes with 6 sheets (12x12) with 2 of each color.  It's a softer brushed look compared to our foil paper.  

    Each piece is 1 3/4 x 4 1/8. Cut all 3. Line them up in the embossing folder, and use our new Stampin Cut and Emboss machine (yay it's finally here) and it's lovely! 

    Adhere these 3 panels on a whisper white base (you can't see it in the photo) 3 3/4 x 5.  Add a folded piece of this Metallic Mesh ribbon (I think it looks like the Moose is walking on our frozen lake).  

    Stamp the moose in Early Espresso, punch him out and add to the mesh. Add the greeting to a piece 1/2 x 2".  Add this front piece to a card base 8 1/2 x 5 1/2 (I used Peacock but anything would work).  I don't think it needs anything other embellishment -- what do you think?


    Lots of moose projects on my blog!

    If you type "moose" in the search bar you'll see all kinds of moose projects!


    We will create this card in class on Friday Sept 25 or Saturday Sept 26 (same class 2 options) - the whole class will be about fall and foils including specialty paper, these foils and more "shimmery" options! RSVP MaryKate@MaryKateScott.com. 


    There is an option "to go" and to have the class delivered to your door and to join my Zoom - let me know if this is of interest. Class details on the tab "Workshops...etc"

    Happy stamping, MaryKate


    Thursday, September 10, 2020

    High Tide Lighthouse cards and the LL Bean Bag

     A fabulous, classic set, High Tide makes lovely cards.  This one uses a vellum overlay to focus the eye on the message and the bright yellow light.  Here it is with the vellum overlay...


    And here it is showing you the card front under the vellum.


    Dimensions:  Base 8 1/2 x 5 1/2 folded; Black 4  x 5 1/4, Bumblebee  3 3/4, x 5, White 3 1/2 x 4 3/4.  Vellum 3 3/4 x 5. 

    This is a 2 step stamp so it's easy to line up the 2nd image (the red stripe).  

    Tip:  You can stamp on vellum but if you do, let it dry a good hour! or use black embossing powder as I did here.

    Thank you Betsy for another fun card design!


    We made so many cards with this set including an "LL Bean Bag".  Here's a link to the cards and the how-to for the LL Bean Bag. Click to see cards


    Here's the post for the LL Bean Bag Click here for the LL Bean Bag

    And Click here for LL Bean Bag instructions

    Questions? email me MaryKate@MaryKateScott.com 

    Need supplies?  Check your stash first :) and then click on the shopping cart to get to my online store if you need something :)

    Happy stamping, MaryKate


    Wednesday, September 9, 2020

    Playful Pets: cards with Cats and Dogs

    These pets cards are so cute!  This Zee Fold card with the dog is great (I just love his big pink tongue!) 


    Here are all the dimensions:  Black base 4 1/4 x 11, fold in half and fold the front back in half (if you wish to score, score at 2 3/4 and 5 1/2.).  Add the designer paper with the bowls, bones and paw prints (cut this 2 1/4 x 4 to the front "flap". Add a smaller strip 1 x 4 to the front of the zee (the white lettering on black paper). 


    To make the front, add a piece of Real Red 5 x 1 3/4 to the front, top this with white 5 x 1 1/2. 


    Now use your layered circle dies and cut the largest and 2nd largest circles, add to the front, then add your dog, greeting, and bowl. I layered in a small piece of twine between the greeting front and back, so it's hanging off his paw!  


    Betsy Lang my teammate, designed this fabulous card, thank you Betsy!  (We have such a great, so much fun, so much sharing of ideas, positivity and laughs, if you are interested in the no-obligation kit $99 to join us please reach out MaryKate@MaryKateScott.com and I'll give you all the details.  Bottom line, 20% off everything, free products, and this month 2 free card kits).


    The cat card has personality.  The base is 4 1/4 x 11, scored at 5 1/2, layered with Basic Grey 4 x 5 1/4. Die cut 2 stitched rectangles, start with 3 1/4 x 4 1/2 and cut to 3 x 4 1/4 in the designer paper, and then start with 3 3/4 x 5 cut to 3 1/2 x 4 3/4 in the Flirty Flamingo pink. Add 2 die cuts (from the Poppy Parade dies) and a 2" white circle for your greeting.


    Add the cat with dimensions and the little heart collar.  


    For the insides add the left over die cuts from the rectangles.  Add the 2 cats.  Thank you Julie Robinson for this lovely design!


    If you are interested in the Playful Pet paper, stamps, dies or any cardstock, it's all in my online store, don't forget the host code (top right) for free embellishments from me!


    Happy crafting, MaryKate

    Tuesday, September 8, 2020

    Herringbone "Quilt-look" card with Warm Hugs Designer Paper

    This is super fun, quick card to make. I'll be on Facebook.com/SipCraftCare tonight Sept 8 at 5pm and I'll create this card.  Click here to see the video that was on FB Live

    If you'd like to craft-along, all you need is:

    -about 8-10 strips of 6" x 1/2" designer paper (smaller patterns work best)

    -Whisper White 5 1/2 x 3 3/4

    -Matching Cardstock 5 1/2 x 4

    -Card base (8 1/2 x 5 1/2 folded)

    -ribbon or trim

    -greeting

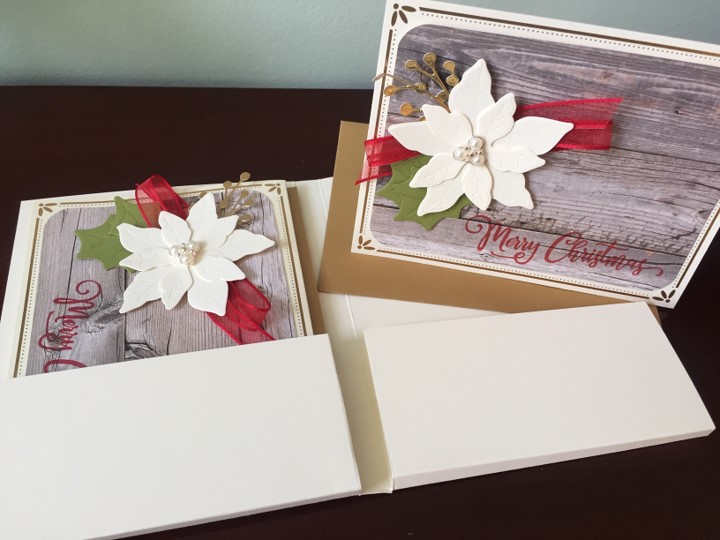
    If you sew or quilt I bet you (like me) see a "quilt block" in this fun card.  

    One key tip is how to start your herringbone card:  on the Whisper White start with a T, that is a strip on the diagonal (the cross of the T), see the middle red strip with dots, and then adhere the vertical of the T at a right angle, see the green strip with x's.  I'll post the video I  make at 5pm, here on this page.


    This is such a fun way to use your designer paper.  If you use paper from 1 pack it automatically matches, I love that!


    Hope to see you tonight at 5pm.

    Also I've updated my class list:  These are in person in Hartland, all 10-2, include 6-8 projects, stamp set and light lunch (and treats prizes and fun!)

    Sept 25/26 Fall/Foils

    Oct 2/3 Mix of Halloween and Holiday cards 

    Oct 25/26 Holiday cards, packaging and decor

    RSVP to MaryKate@MaryKateScott.com

    I'll be offering the above classes on Zoom, if you are interested in this option, let me know and I'll reach out to the group to find a good time, I'm thinking of Wed or Thurs evenings 5-7pm -but let's see what suits the group!

    Night school is cancelled this year but it looks like we have an option for 4 Mondays 5-630pm in Palmyra, stay tuned. If so, we'll have a class of 6 people (max) on Sept 21, 28 and Oct 5 and 19.  Quick fun classes for $5.  RSVP is essential, particularly now, places are limited for social distancing. 


    Enjoy September, Fall, Back-to-School and our beautiful leaves and crisp sunny days! I love fall!


    Happy Crafting MaryKate


    Monday, September 7, 2020

    IDEAS Blog Hop Everything Masculine with By The Dock


    Welcome to our IDEAS blog hop for September 2020. We are 12 international Demonstrators with a 60 page full color tutorial bundle for you.  This month the theme is Everything Masculine We will each show you projects that are perfect for the men (husbands, sons, brothers, fathers, uncles and others!!)  (We each have detailed instructions in imperial and metric) 


    I used By The Dock. I summer in Maine and my own lake and dock inspired this Zee card and the matching summer lantern. If you love watercoloring pencils, this project is for you.

    All the details, how-to, dimensions and tips are in my tutorial. Lots of photos to make it easy to follow along.

    Here is our sneak peek collage for the September IDEAS Tutorial Bundle.  Each photo represents one designer's tutorial in our bundle.


    I hope you like these projects and the projects from my fellow IDEAS demonstrators.  It's really a great bundle of inspiration for crafters or demonstrators looking for new ideas or workshop ideas.  Keep hopping so you can see all the creativity.   The bundle is about 60 pages of detailed full color instructions with 40+ projects (cards, decor, 3D, and more!)

    Would you like a copy of the instructions for these projects to use for your personal use, or even to use in your classes? Contact me at MaryKate@MaryKateScott.com Free to customers who purchase $35, or Free to my team members, or $15 by PayPal.  

    Once you have received the tutorials, please remember not to share or distribute the printed or electronic copies of these bundles. We have worked hard to provide these exclusive projects for your use. If you know someone that would like to purchase the bundle, please direct them to me to obtain their copy. Thanks for your support.

    Thanks for stopping by. Please click on NEXT and visit Caroline the next talented IDEAS demonstrator!  Her projects feature gorgeous florals!

    Happy Hopping! MaryKate


    Tuesday, September 1, 2020

    Clearance Rack Refreshed today!

    Hi all, 


    If you are like me, you love Stampin Up products and love them even more when they are on sale!!  The clearance rack was updated today Sept 1st and there are lots of fun embellishments, ribbons, punches, paper and more.  

    Add in the host code -- you can always find it on my page (top rght) -- and I'll be sending you some bling as a gift for shopping with me! 

    I have lots of fun posts, projects, classes, and video coming up. After a great break in August, I'm energized to come back with crafty ideas for you - stay tuned!

    Happy shopping - MaryKate