Thursday, September 29, 2022

Rustic Harvest How to use Autumn or Fall Paper for simple pretty cards

It's fall here in Maine, I love the leaves!  

Rustic Harvest cards along with #SimpleStamping makes card making easy


So I got out my Rustic Harvest paper along with my Charming Sentiments and created a few simple fall cards.  


I think this paper works for a lot of greetings.  I used Charming Sentiments including the matching dies (love how the dies do the fussy cutting for me).  The link (in blue underline) shows you the set with the matching dies... a winner and a time saver!

CharmingSentiments


Adding just a few of the brass butterflies, made these cards pop.  Can you see them... I put them in the flowers, they are small but I loved the white butterfly and wanted to echo this design. 


Rustic Harvest

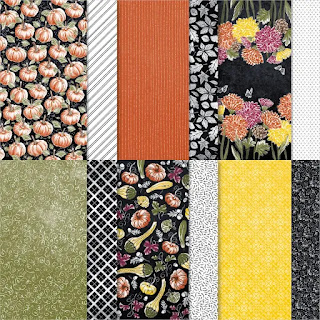
Here is the full set of designs this paper offers! Most of mine is gone but I'd been saving this last sheet!


Happy creating, Happy Fall - MaryKate


#RusticHarvest

#CharmingSentiments

#FallCards

#BrassButterflies

Monday, September 26, 2022

How to make a Bookmark Card that also fits a Gift Card

How to make a quick handmade Bookmark card

Updated Sept 28 2022 after some great ideas from my lovely team!

I was asked to create a few "bookmark" cards for my library as part of their booth at BayFest on Anna Maria Island FL. My library is the Island branch. I host free classes there, I'd love to see you.

These are fun simple "diagonal pocket cards". This is the "before" photo using the In the Moment stamp set.

bookmark card

In the Moment Stamp Set

Diagonal Pocket Cards


And the after photo... my question to my crafters... the bottom of the cards look "bare" or odd!

Thank you Lynne who said pull out one of the bookmark layers! what a difference. Thank you Diana who suggested just a few loose flowers!!


These go together quickly:  layer the back designer paper cut 4 x 5 1/4 on the 1/4 sheet of cardstock.

Cut the 3 x 4 designer piece into 2 triangles (you'll need 2 of these for matching triangles), make sure you cut each piece into triangles in the opposite direction so you have a right and a left triangle.

Updated Sept 28 after class.. thank you Lori for suggesting I include these photos for the pocket. Step 1: cut 2 pieces 3 x 4 (this will make 2 pockets). Note that each of these pieces are lined up differently. This is how you make the left and right triangle pieces.


You can create a short pocket (like I did for my bookmark cards) or a longer "skinnier" pocket. 


Here I'm showing you why you need 2 pieces of the 4 x 3 designer paper. 
You need a right and a left pocket -- or you can have 2 different patterns (as our paper is 2 sided)

Adhere the pockets down on the very edge of the side and bottom NOT the diagonal, to be sure you can insert the bookmark or gift card

To make the book mark I used the Contour dies, I love these dies so much I'm on my 2nd set!  I cut 2 of the scallopped rectangles. The bookmark image and sentiment is from the In The Moment stamp set. I love these line drawings.  You can click on the words in blue to see these dies and stamps. I punch the 2 rectangles and tied them together with organdy ribbon.

Coloring tips: I used Stampin Up blends, if you look closely the best tip comes from my team mate and friend Diana Michaud... she says leave a bit of white, it will give movement to your images, and I think she's right.  I used the matching in color blends.

Dimenions:

Designer Paper – 3” X 4” for each card cut in half on the diagonal, I used the new in-color paper
Cardstock 4 ¼” X 5 ½” for card back - I used our new In Colors Tahatian Tide and Parakeet Party
At the back is a piece of the in-color designer paper 4 x 5 1/4


Here's a link to a blog post a few years ago with a diagonal pocket card

click to see alternative pocket cards

I'm looking for a little help and inspiration... I think these cards need "something" at the bottom right of the page. Do you agree? Do you think I should add a greeting? add some extra organdy ribbon?  I'd love your 2c and your ideas in the comments.  I'll post an updated project once we all figure this out!!  


If you need paper, stamps, the pretty organdy ribbon... my online store is a click away, just click on the shopping cart.

Don't hesitate to reach out with questions, always here on MaryKate@MaryKateScott.com

Happy stamping, happy reading, MaryKate


#bookmarks

#bookmarkcards

#diagonalpocketcards

Sunday, September 25, 2022

Paper Pumpkin Sept 2022 Halloween Spooky Treats

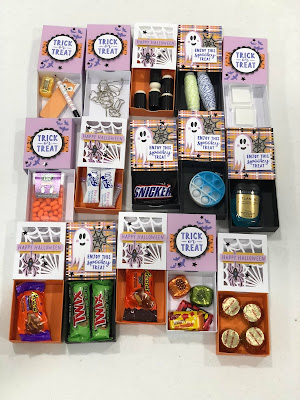
This month the Paper Pumpkin box contains ingredients for 18 Halloween themed boxes.  Of course they are perfect for candy and treats.


My friend Monika Davis created a whole bunch of cool ideas for what would fit into the boxes.  See her ideas below.


I'll be creating my box this week and I have a few ideas for cards as well.  I'll post my creations here.


Here's a video of this month's projects 


If you are not familiar with Paper Pumpkin it is a monthly One-Stop Box™ that offers a unique variety of paper projects for crafters of any skill level to enjoy! These all-inclusive craft kits enable you to explore creativity, try new techniques, and discover papercrafting.  The best part... everything you need to create is inside the box, so you can take it anywhere.


You can purchase 1 month, create a subscription .. just as you wish. You can place a hold on your subscription or even add an extra kit (perfect for next month's Ho Ho Ho kit for many Christmas cards). 


Click here to explore Paper Pumpkin


If you are a subscriber, you can purchase refills of the kit (everything in the kit except the stamp spot and stamp set) and they are now available in my online store. 


Happy stamping, Happy Halloween!

MaryKate

Friday, September 23, 2022

World Card Making Day Party - Oct 2nd 2022

 Hello Crafters


Did you know that the first weekend of October each year is World Card Making Day? It's a Global event. Let's celebrate, create and send cards.

In celebration, I'm hosting a party with lunch followed by crafting. You can come to lunch or crafting or both I hope!  

This is a free event. 
Sunday Oct 2nd at my home in Hartland email me for details MaryKate@MaryKateScott.com

Lunch, chat, party 1230-2 - Charlie will get the grill going (beef, turkey, veggies burgers) and several of us will bring sides and treats.

Crafting 2-4 - a huge card buffet of projects for you to pick from!  Holiday cards, and not-holiday cards, kit cards, packaging... 3 demonstrators (that have 3 different styles) will be creating projects for you!  Lots of fun projects, and many lovely crafters to meet and connect with.

Your men are invited, they can grill with Charlie and he'll have the football going after lunch (Patriots kick off at 430pm Oct 2nd so you'll be home for kickoff!)

Please rsvp so I know how many burgers to buy and how many cards to make!
Let's celebrate, craft and connect!


Thursday, September 22, 2022

Making a Baby Dresser Pop Up Card for New Baby Welcome

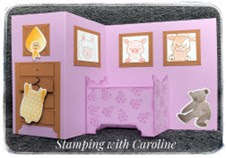
I was asked how to make a Baby Dresser pop up card.  


Pop Up Baby Dresser Baby Welcome Card


My friend Caroline - a Dutch Demonstrator - created this pretty card along with a tutorial.  She said I can post the image of the card and then if you'd like the tutorial I can send it to you.  It's a super tutorial with clear instructions.  Free to you!


She created this tutorial as part of our IDEAS bundle.  The IDEAS bundle is a suite of 12-15 tutorials with a theme that we create each month.  We share this bundle with all our teammates and with our customers. You can see our projects in our monthly tutorial on the first Monday of the month.  


Our next hop is Mon Oct 3rd, 2pm with Christmas Crafting Projects.


You can reach out to me on MaryKate@MaryKateScott.com for her tutorial. No Charge but I want to respect her request that you receive the tutorial vs posting instructions on my blog.  


It's such a cute card... and I love the pop out factor. And it's easy (really!)


Don't hesitate to reach out, I'm here on MaryKate@MaryKateScott.com


#babydressercard

#babycard

#popupcard

Paper Pumpkin August 2022 Sunflowers easy extra projects from the kit

I love Paper Pumpkin! It's a fun kit that comes each month with projects ready to make with no preparation.  Here is the August kit.

Paper Pumpkin Aug 2022 Sunflowers


This month we had some really pretty cards with a Sunflower set.  I made mine up pretty much as the kit suggested.  


I was also able to create some pretty sympathy cards with this kit and the stamp set Inspired Thoughts. This stamp set is a winner - stunning font, versatile greetings.  At $19 it's great value and one I'll use for many projects


Inspired Thoughts Stampin Up


This one below is from Cathy Jones. She used the extra gift we received in this kit, the gold honeycomb background. 


This month the kit is all about Halloween. It is treat packaging, 18 boxes, I don't have mine yet, but I can share a video that shows you what you get.  Also... the refills are available early! To get a kit or a refill, click here for my online store


Or reach out directly to me MaryKate@MaryKateScott.com and I can add this to my order today.


We will be using the November Paper Pumpkin Christmas kit for our Tuesday Night Online Classes in November.  I'll create 2 classes with 6-8 extra projects using this fun Ho-Ho-Ho kit. Would you like to join us?  This project kit with 6-8 projects using the stamp set in the November Paper Pumpkin is $29 shipped to your door for the extra projects and I'm happy to combine shipping for savings.  Nov 1, 8 and 15th 6-730pm and it's recorded so you can watch or replay it anytime.  


Paper Pumpkin Oct 2022 Ho Ho Ho


Here's a bit more about the Ho Ho Ho kit

This kit contains whimsical designs of Santa and his reindeer in a classic Christmas color palette which is sure to match various styles of holiday décor and look great on mantles everywhere.   Each kit contains enough supplies to create 9 festive cards—3 each of 3 designs—and 9 coordinating envelopes. These cards are sure to bring the warm holiday spirit. 

RSVP to me MaryKate@MaryKateScott.com by Oct 20th for this November class series.

And if you need anything (check your stash first!) or click here to shop with me  Shop with MaryKate


Thank you and Happy stamping - MaryKate


#StampinUp

#PaperPumpkin

#InspiredThoughts

#EasyHandmadeCards


Wednesday, September 14, 2022

How to use the Aspen Dies for Halloween Lights and Lighted Projects

Using the Aspen dies for Halloween projects  --  creating projects that light up!

Halloween Aspen Tree Projects


I have 3 projects for you today for Halloween, all super easy and quick, and some with some cool coloring techniques.


The bag is very simple, but I have a useful tip for you before you die cut!  You can find the bags on Amazon or Walmart (search orange paper lunch bags), they are about 5 x 8"


If you die cut the bag while flat, you'll have a slight overlap on to the bag. While this doesn't show from the front, you are taking away paper and making the bag is bit more flimsy (or as Charlie says... comprimising the structural integrity of the bag - hey he builds big stuff including bridges!).  See bag above on the left without folding, on the right it's folded so the back won't cut out.

Instead fold the bag at the bottom, so the bottom folds up, then die cut - see the photo.

Add candy, shred, and little fairy lights (Amazon search "fairy lights"), about 12 for $10.


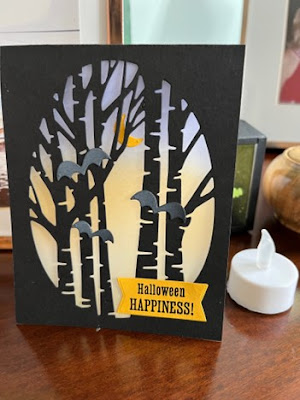
The next project uses the Aspen dies, and then covers the opening with vellum.  I used blending brushes and inks to create the colors. We played in class and decided we liked my combination (Starry Sky, Pumpkin Pie, Crushed Curry) but we loved Starry Sky, Rich Razzleberry and Pumpkin Pie for a more spooky or dramatic look.  

The black card base is 4 1/4 x 11, white it 4 x 10  1/2 folded in half. The vellum is 4 x 5 1/4

Tip with the blending brush (or sponger or dauber), tap on the ink and then "take off the color" on a scrap (or your grid paper) and then apply to the vellum in a swirling motion.  This creates a softer look. If you don't "take the color off" you'll get big blotches!!

I added the vellum to the inside of the card, and then you can use this as decor with a tea light between the first layer of white and the vellum, here it is lit up (bit hard to see in the daylight!)


The final card project uses the darkest of the silver foils for the front of the card (popped up on dimensions) and then I added bats and the googly eyes.  Tip: on the black base below the silver foil, I used white craft ink, swirled on lightly to give the woods a spooky look. You can also use the white pencil that is part of the watercolor pencils. Card is 4 1/4 x 11 folded.


All the greetings were from the stamp set Scary Cute (but many Halloween sets work).

Here's a link to purchase the Aspen dies

I'll be posting more Halloween projects later this month

Questions? Don't hesitate to reach out to MaryKate@MaryKateScott.com

Happy Halloween! 

MaryKate


#Halloween

#StampinUp

#AspenTreeDies

#Aspen

#LightUpProjects

Tuesday, September 13, 2022

Fast & Fabulous: 5 quick and easy cards from 1 sheet of cardstock with Eden's Garden

Hello crafters 

This project is about creating 5 cards at once with a simple template.  Choose a stamp set that has a combination of flowers and leaves and keep it simple with just 2 colors.  You will stamp on 1 sheet, then cut this sheet into 5 bases, then you’ll add layers and greetings, embellishments if you wish. 

I used Eden's Garden -- and it is on sale Sept 15 2022 for 1 day only at 15% off!! All Annual Catalog Stamps are on sale!  Yes All!!  click here for the list of sets on sale Sept 15 2022


Fast and Fabulous Quick Easy Greeting Cards

You start by creating a template, you can either use a pencil or a score tool.  I used a pencil so the template would show up easily. If you use a pencil, you’ll trim your card front just a tiny bit so the pencil lines won’t show.


Follow the template and mark off the 5 pieces that are each 4.75 x 3.5” that is 12cmx9cm. There are 2 waste pieces, the ½” or 1cm left on the right and the 2 bottom small pieces.


Now to stamping with a few tips:


1.    You will stamp so that 2 corners have stamping with the remaining part of the card for your greeting.

2.    Stamp the larger flower 7 times, considering each of your card bases.

3.    Stamp the larger leaf at least once on each base

4.    Stamp the smaller leaf at least once on each base.


Now you are ready to cut your bases. The first cut is just past the pencil line (so it won’t show). The second cut is on the other side of the pencil line.

You have 5 bases! Choices: will they be horizontal or vertical? Do you feel you have enough stamping, or do you wish to stamp a bit more?

What layers will you create?

A quick option is to use the same template but add 1/8” or .3cm (yes very small) to each measurement.

So first vertical cut is 4 7/8, second is 8 3/8, then you cut the 5 pieces so they finish 4 7/8 x 3 5/8.  That is 12.3cm x 9.cm finished.


This is really a “two-sheet” wonder, 1 sheet for the top layer of stamped bases and 1 solid cardstock sheet for the layers.

Another option is to use your left-over pieces and add layers. I did this and used Highland Heather, Granny Apple Green and Silver Foil.

Let’s create cards.

You can either stamp right on the base (quick, easy) or you can stamp and punch out shapes.  I love both options and they are fast and fabulous. 

My thank you cards  My layers are Silver foil. I used the Lovely Label punch. and the lower card has a 2nd punch split in 2 so there’s a shadow silver effect. 

The upper card uses some Silver Mesh ribbon to bring out the silver, along with a rhinestone.

Still fast but a bit stepped up with metallic paper and ribbon.


The lower card has a 2nd punch split in 2 so there’s a shadow silver effect. I used the bough punch for leaves – all of the greeting embellishments are up to you.


A “fast” tip: I keep a pot of shapes (punched shapes or die cut shapes) and when I need a card, I just get a shape that is all ready and I add it to a card.  


You can just see that I also stamped my envelopes, I love the matching look and it takes just a few extra seconds.


These cards work vertically or horizontally.  

This is a fun "girls afternoon of crafting".  You can have the templates ready and each person stamps and cut their own cards.  These are fun cards for “just a note” or birthday or Christmas.  It’s also relatively inexpensive, 2 sheets of cardstock and scraps for greetings, along with ribbon and embellishments.

If you are looking for a simple fast card holder our new treat packaging “Embossed Treat Bags” 159251is a ready made bag that easily holds 5 cards and an envelope!

This would be a fun to do toegether and is easy, fast preparation!

Here's link for my online store to purchase this pretty stamp set

I hope you try this technique!

Happy Stamping - MaryKate


#FastFabulous 

#EdensGarden

#StampinUp

#SimpleStamping


Monday, September 12, 2022

IDEAS September 2022 Blog Hop - Famil Celebrations

Hello and welcome to the IDEAS Blog Hop for Sept 2022 - featuring projects for Family Celebrations


Welcome to our IDEAS blog hop for September 2022. Our theme of Family Celebrations is very broad: you'll see projects for Wedding, Birthday, Christmas, Halloween, Thanksgiving and more! 

This month we have curated tutorials from 11 international Demonstrators with a 50+ page full color tutorial bundle for you, featuring colorful cards and 3D projects.  You will get 11 detailed tutorials with a range of projects including 11+ cards and 11 3D projects.  The tutorials have detailed instructions in imperial (aka inches!) and metric.


Here is our sneak peek collage for the Septemer IDEAS Tutorial Bundle.  Each photo represents one designer's tutorial in our bundle.

I love Halloween and created a sampler and a card with the Scary Cute set, I just love these trick or treaters. 


All the details, how-to, dimensions and tips are in my tutorial. Lots of photos and diagrams to make it easy to follow along.    A super fun project or class!

I hope you like these projects and the projects from my fellow IDEAS demonstrators.  It's really a great bundle of inspiration for crafters or demonstrators looking for new ideas or workshop ideas.  Keep hopping so you can see all the creativity.   The bundle is about 50 pages of detailed full color instructions with 30+ projects.

Would you like a copy of the instructions for these projects to use for your personal use, or even to use in your classes? Contact me at MaryKate@MaryKateScott.com Free to customers, or Free to my team members, or $15 by PayPal.  

Once you have received the tutorials, please remember not to share or distribute the printed or electronic copies of these bundles. We have worked hard to provide these exclusive projects for your use. If you know someone that would like to purchase the bundle, please direct them to me to obtain their copy. Thanks for your support.

Thanks for stopping by. Please click on NEXT and visit Sigrid in Germany, she's the next talented IDEAS demonstrator.

Happy Hopping! MaryKate


Bewitching Bundle Class 1 project instruction set

Hello crafers


The Bewitching Bundle Series continues! 


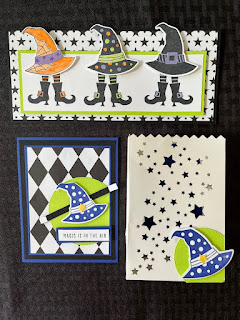
1. Slimline Hat Card - a great option is to use "wobbles" on the hat so they bounce and wobble.  Another option is to create this card vertically, with 1 pair of boots and 3 hats, one on top of each other!


Base 8 ½ x 7 ½ folded in half

Designer paper 8 ¼ x 3 ½

Parakeet 7 ½ x 2 ½

White 7 ¼ x 2 ¼

White for inside 8 1/4  x 3 ½

White for the hats

Scrap of grape for the hat band


2. Magic is in the Air 


Base: Starry sky 11 x 4 ¼

Black 4 x 5 ¼

Starry 3 5/8 x 4 7/8

DSP 3 3/8 x 4 5/8

3” stitched circle in Parakeet

Wand is ¼” strip of black with white ends

Greeting is ½ x 2 1/8 and the starry background is 2 3/8 x 7/8

White for inside 4 x 5 ¼


3. Starry Bag

2” circle and a scrap for the hat and the star

The bag is available in my online store - it's really a lovely thickness, perfect for many holidays (Christmas, New Years, Halloween) and can be spritzed with shimmer or re-inker. Just add a tea light and it's a fun decoration. 


A shout-out and much appreciation to Brian King a GA based Stampin UP Demo who provided the inspiration for these fun designs!

Join us online for 2 more Bewitching classes Sept 13 and Sept 27 (yes we are away for 1 week).  Contact me on MaryKate@MaryKateScott.com for info, details and questions. I'll post the projects with instructions right here!

I have 1 more kit left to create online in October with the Tree Lot stamps and Dies (you'll need both to complete the projects, and I hope you got the dies while they were free in SAB!)


Happy Halloween!
MaryKate

#Halloween
#PaperCraft
#Bewitching
#StampinUp


Tuesday, September 6, 2022

Labor Day weekend... perfect time to make Salsa! Bewitching Class 1 is tonight

I love making homemade Salsa. I stopped by our local Amish foodstand and bought all the ingredients and spent the day chopping, stirring, and water-bathing jars.


Do you like the Kraft holder above? We had this last year in our catalog but I have several left, please reach out if you would like some, they are perfect to hold jars or bottles or coffee cups.

I have not yet put labels on the jars (but I will) and I also might cover them in paper (instead of fabric). To do this cut your paper 6x6 an either leave as is or you could round the corners. Spritz or spray with rubbing alcohol and quickly place the paper over the jar. Firmly press the paper, and it will dry quickly and in the right shape of the jar.

I made a video last year, it's quick, if you're more of a visual learner

Click here for the post and video

I love all kinds of salsa but my husband loves Zucchini salsa. Here's a link to the recipe on Food.com

Click here to go to Food.com for the recipe My tip:  reduce the brown sugar to 1/4c or less.

And here's a recipe for more "standard" salsa also on Food.com Click here to go to Food.com for the recipe


Tonight is the Bewitching Bundle!


Tonight is our first Bewitching Class - what an awesome bundle of stamps and a matching punch. I'm a huge Halloween fan. Here are the class 1 projects. I'll post all the "how-to" and dimensions tomorrow. I love the Wizard card, great inspiration from Demonstrator Brian King in the Atlanta area.  


We will be using wobbles (see the post Sept 1) on the 3 hats tonight. 
I'll provide more details on the Bewitching projects tomorrow.

Today was a busy day creating kits for our October Online Class featuring the Tree Lot Stamp set and dies that were part of Sale-A-Bration with the Camper. Kits are done, and I'll post photos tomorrow as I wrap up the tutorial. I have 3 kits left for sale - $39 delivered to your door. 3 classes, 2 projects each class, live by Zoom with a lovely group, or recorded for viewing anytime.


Happy Stamping - if there's anything you need, you can reach me on MaryKate@MaryKateScott.com
Thank you for choosing me as your Stampin Up Demonstrator and shopping in my online store!

Thursday, September 1, 2022

Christmas Scottie Card that Wobbles and is a Valentine!

It's been a while since I posted but I'm back to my blog, and grateful you are here (and grateful I was able to take care of family priorities these last 6 months).


Today I have a fun simple card for you - I used the Christmas Scottie set with punch to make a Valentine's card with 2 Scotties that Wobble! 

Dimensions:  Poppy Parade base 8 1/2 x 5 1/2 folded in Half, White 4 x 5 1/4 with the corners "edged" with the new Best Trio Punch.  The hearts are from Cheerful Tags dies (but there are lots of heart dies or punches that will be great.

Papers: The Scotties are in the New In Color Sweet Sorbet Designer Paper and the hearts in the Sweet Sorbet glimmer paper.

Wobbles - just head to Amazon and search "wobblers for cards".  

We did a team creativity challenge with wobbles and have these tips to share:

Put the thinner edge of the wobbler on the creature that needs to wobble and the thicker edge on the card, you'll get more "wobble".

The Christmas Scottie Stamp set with matching punch, the Best Trio punch, papers etc are all for sale in my online store (just click the shopping cart). The Host Code is top right, by using this gifts will come your way. 

Always here for any Q&A you have! MaryKate@MaryKateScott.com


Happy Stamping - MaryKate

#ChristmasScottie