Saturday, September 30, 2017

Painted Autumn Paper Envelopes for Customer Gifts – envelope punch board tips


I love choosing a free goodie and making a matching box or packaging for my customers.  These are for customers who bought in September.  I hope they like the rhinestones (an essential in my craft drawer).  And I hope they like the envelopes too. 

I thought I’d make envelopes and I reminded myself of how much I like our envelope punch board. It makes envelopes easy peasy (and if you search on envelope punch board, you’ll see how to make boxes and other packaging… also there are patterns in the tab Ideas, Projects, Free Stuff)


I used the Painted Autumn paper.  I measured the rhinestone package and decided on a 4 ½ x 6 envelope. 

The grid at the bottom of the board told me to cut the paper 8 ½ x 8 ½ and it said the first punch is 3 ¾ - can you see where I'm pointing to??

So I punch and dragged the stylus along the groove.


Step 2 – DON’T use the ruler at the top (see my X) line up with the “pointer or score guide” and punch and drag the stylus… do this for 3 sides


Round the corners with the punch at the top.


Fold the sides.  I used tear n tape to secure the envelope.


Insert the rhinestones or card.  

I snipped out some sunflowers from another sheet of the paper.  And stamped the greeting from the Painted Harvest set, securing the envelope shut with a glue dot.

See the pumpkins… the envelope ends up on the diagonal, just so you know, I still think they look cute.  Ok 4 done, and a bunch more to go, thanks for shopping with me and using the host code. 


Happy stamping MaryKate

Don't forget our Big Holiday Crafting event Oct 14 1230-4pm $30 for 5 projects and the stamp set Watercolor Christmas!


Vintage Leaves Cards with matching wine tag and box


From hot at the beginning of the week to crisp fall days!  I had to get out Vintage Leaves with the matching leaflet dies – I love this fall look. 

I made several different cards with different techniques.

The first is a layered looked using the woodland embossing folder.  Just stamped some leaves and then cut out a piece (like making my own designer paper).

This one uses a border technique, you stamp the first layer – don’t worry about what the middle looks like, only the border shows.  Love the crushed curry and the matching twine.  These colors of Cajun Craze, Crushed Curry and Always Artichoke say fall to me.


This one uses Garden Green so it’s a brighter look.  These pinecones were in clearance and I think they are nice on a fall card not just a holiday look. 


A matching wine tag, 2 x 5, banner punch the end and round the other end with a 1 3/4 circle. Sentiment is from the set Sheltering Tree.


And a matching box as I might package these up for a gift.


Keep watching the clearance section, things get added!

Stay tuned for October – lots of promotions – Buy 3 and Get 1 free Designer paper, the Paper Pumpkins for Oct/Nov are matching sets and World Card Making Day Oct 7th is the perfect reason to put a bunch of my favorite sets on sale at 15% off along with notecards at 15% off.

Don’t forget our Big Holiday Crafting Event Oct 14  -- 5 projects and a stamp set (Watercolor Christmas) for $30 if you RSVP by Oct 5 (more after that if I have to pay for expedited shipping!


Happy stamping MaryKate

Friday, September 29, 2017

World Card Making Day Oct 7

Real mail... I just love it.  I've received Anniversary cards, a thank you note, and a thinking of you card in the past week.  There's nothing like handwritten note.  


World Card Making Day October 7 2017 is as good a reason as any to put a card in the mail.  I hope you make one and make someone's day.

Stampin Up has a great sale Oct 1-10 with new stamp sets, notecards, fast fuse and more.

My favorite 2 sets - Coffee Cafe and Seasonal Colors are both part of the sale! Woohoo!

Here's the 2 page flyer 

And some cards using some of these sets!


Happy Stamping, MaryKate


Tuesday, September 26, 2017

Poppers or Crackers? Seasonal Colors make your own Fall designer paper


Some people call these poppers and some call them crackers.  I like to stuff mine with mints and put the on a table for decorations.  

This is an easy fast envelope punch board project. It's part of the fall collection we are creating Sat Sept 30 2pm at the Hartland Library.


1.Cut the paper 5 ½ x 6” you can use designer paper or stamp your own design – stamp first, then score.  My stamping is in Cajun Craze and Crushed Curry.  I think it would look great to add in Always Artichoke as well.  

2.The 6” is the length of the cracker (think about any directional pattern your paper has)
3.With the 6” along the top score at 1 1/4 and 4 3/4
4.With the 5 ½ along the top score at 1 ¼, 2 ½, 3 ¾ and 5”
5.Fold all score lines

6.With the 6” along the top of the punchboard, line the paper at the 1 1/4 “ punch (no scoring)
7.Flip over the paper, score at 1 ¼
8.Tip: I put a yellow sticky note at the 1 ¼” on the punch board (see top left photo), it keeps me right there at 1 ¼ (good if you’re doing a lot and enjoying a glass of wine)
9.Repeat for all folds – see photo above for how it looks when all the punching is completed

10.Put tear n tape along the ½ edge see my arrows??

11.Pinch one end of the cracker and tie with about 8” of ribbon, then put the candy and tie the other end (yup I’ve tied both ends then thought… hmm should have put in some chocolate mints J)

Quick fun fall decor. I hope you make one.

Let me know if you want to join us for class on Saturday - we'll make the candle, the popper/cracker and 2 pretty fall cards.  I'll also demo some other projects that I've made for table decor with this same set.

Happy stamping, MaryKate

Monday, September 25, 2017

Team challenge - Merry Cafe Carols of Christmas and Hearts Come Home

Love being part of our Stampin UP team - we are from all over the US!  We have a weekly challenge with a winner drawn at random. 


This week was a sketch.  Great idea.  I think this would be great for a photo card for Christmas.  I also loved everyone's entries.  


Here's Vicki Eisenbeisz who made a scrapbook page - super idea (on the right).

Debbie Green (below) - fun idea - and we'll be playing with this set Carols of Christmas in October.


Michelle Haney - how fun is that broom with the jute!  Love this.


And mine... I love the Hearts Come Home set and had fun making the village and making it snowy... but there's something not quite right!  Fun to do a challenge, it makes you try new things and see papr in new ways (designer paper is from the Coffee Cafe!)

It's a great team, you can do whatever you like - just enjoy being a demo with the 25% off or make it a fun business -  happy to chat about our team or the starter kits ($99, you chose $125, no shipping and no further obligation)

Happy stamping 
MaryKate

Sunday, September 24, 2017

The Seasonal Color Fall Candle (stamping on wax or a waxy finish)

I had several questions on the candle that was part of my fall set (class is Sat September 30 - I'll need an RSVP by Friday morning very latest.

I bought mine at the Dollar Store for $1. 

Here's another photo without the flickering light.


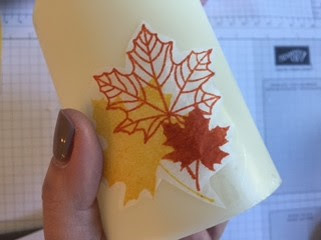
Stamp the leaf images on tissue paper on the smooth side.


Cut out the image – not super close but not too much overhang.

Place on your candle making sure the inked side is on the candle


Cover the tissue with wax paper (so the candle is wrapped all the way round so it’s easy to hold the candle and the wax paper), the wax paper will be firmly against the candle.  


With the heat tool, heat the stamped image and the wax paper covering it.    Don’t burn it or melt the candle!!  Be careful the heat tool is hot!   then slowly peel off the wax paper and make sure you have melted the tissue paper and inked images onto the candle.  You can re-wrap the candle in the wax paper if you need more heat.


You can use real wax candles, or my example uses an LED candle from the Dollar Store $1 with a waxy finish.. It works great, but don’t over heat it… it’s only $1 and doesn’t have that much wax!

A few mistakes… first I love the look of the many leaves on this one.  

However, I didn’t do a great job of trimming the tissue close to the leaves – see how the tissue shows?  


Also I didn’t wrap my candle tightly and so the tissue wrinkled. 


Anyway, I still like it but thought seeing a few mistakes might give you some tips

Stay tuned for our Big Holiday Crafting Event Oct 14 in Pittsfield ME and also I’ll have 12 days of Holiday Crafting Oct 1-12 on my blog.


I’d be grateful for an order with the host code (top right corner of this page… and you’d share in the customer goodie boxes. Last month it was Emerald Envy Ribbon and Cherry Cobbler twine – 

happy stamping, MaryKate

Thursday, September 21, 2017

September 30 Class Fall Colorful Seasons and Seasonal Layers

Hi everyone


Our next class is Sat Sept 30 2-4pm at the Hartland Library.  Our projects are all about your fall decorating and Thanksgiving table.  

I'm using the Colorful Seasons set (love the Adirondack chair in the Wood paper!) to make 2 cards and some pretty table decor.  This photo shows only a few of the items we are making.  We are making other table decor as well.  

RSVP essential... email me for questions or details!

Happy stamping, MaryKate

PS Stay tuned for 12 Days of Christmas, 12 project ideas Oct 1-12 2017 here on www.SipCraftCare.com

Tuesday, September 19, 2017

Candy Dispenser with Christmas Around the World Paper

A few of you are asking... what are the projects for Big Event Sat Oct 14?

Here's the first project - a candy dispenser - so darn cute.  And it holds a LOT of M&Ms :)

It's about 5" high.   Here's a side photo.  Of course you'll get all the instructions and materials to make this on Oct 14.

I've used the little ornaments for the lid and the Christmas Around the World Paper with the nutcrackers.  (Don't buy it in September, it goes on sale in October!!)

See all the patterns below...love this set of designer paper.

You'll also get 4 other projects and this stamp set - Watercolor Christmas.

You need to RSVP by Oct 5 for the event.  $30 1230-4pm in Pittsfield.

I will be offering an online version of this class. I'll post the details tomorrow!


Stay tuned for my 12 Days of Christmas Oct 1-12!! 
Happy stamping!


Sunday, September 17, 2017

Treat Tubes, Spooky Cat Treat Bag, Luminary and Nugget Holder


Our last Halloween class is Thurs Sept 21 6-730pm at Warsaw - 4 fun projects, hope to see you there! RSVP essential either message or email me!

I'll be posting 12 Days of Christmas projects Oct 1-12 -- don't forget our "big event" is Oct 14 1230-4pm (5 projects, a stamp set, prizes, demonstrations... only twice a year!) I need an RSVP for the Oct 14 by Oct 5 as I need to order your stamp set and all the supplies!

Happy stamping, MaryKate

Saturday, September 16, 2017

Thanks a Latte

I received this stunning Coffee Cafe card with a gift card!  Wow, what a great present and lovely surprise in my mail box.  Check out the pretty details, see the little matching coffee splash protector in green? Love the matching soft sky ribbon.


This was from Suzie Barnes who is our team leader.

I don't often do a card that is 10 x 4 1/4 folded (looks nearly square as folded its' 5 x 4 1/4) but this has given me great inspiration!

I love that this coffee set from the annual catalog has a matching holiday set so we are all getting greater use from the Annual Catalog Coffee Cafe and matching framelits.  

Below right is the new set in the new Holiday catalog.  Great for Halloween, fall, Thanksgiving, Christmas and Valentine's Day!  This will get a lot of use!

What are you making these days - are you doing Halloween or moving into fall cards and decor?

Happy fall
MaryKate

PS Don't forget our Big Holiday event Oct 14 1230-4pm 5 projects and a stamp set $30 you must register (no walk-ins) by Oct 5 latest to ensure I have supplies for you.  email me MaryKate@MaryKateScott.com to book a place!


Friday, September 15, 2017

Halloween cards

In an earlier post I mentioned that I don't send as many Halloween cards as I send treats.  This year it might be different!

I received these really pretty cards as part of a swap and I thought they might give you great inspiration.

The first is from Cathy Jones of Abbot ME who is part of my team.  This card is fun - it looks like a stage and the cats are showing off :) Love the use of the crochet trim.  The Spooky Cat set is great, love the matching punch for the cat.  And the designer paper is so fun. 

Here's a close up of the cats - the cat color in crochet lace with the new black rhinestones and the black cat has tiny black rhinestones. super cute!

This one is a gift card holder from Wendee Jones.  I love the new Merry Cafe set that uses the Coffee Cafe set (including the dies) from the annual catalog.  


Here's a close up of the cat. Wendee, embossed it with clear embossing, can you see how shiny it looks?


And this one is from Carla Blake, great use of the designer paper, the cat, simple and fun.


I hope you enjoyed the inspiration - are you making more cards or treats during Halloween??

Happy fall - MaryKate