Monday, December 5, 2022

IDEAS Blog Hop - We are cut out to be friends!

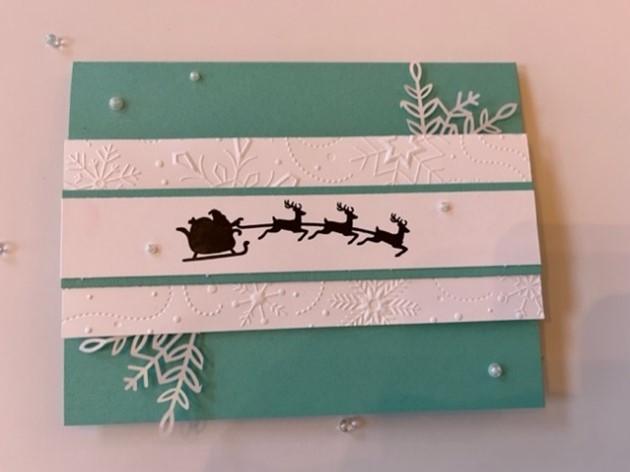
Hello and welcome to the IDEAS Blog Hop for December 2022 - featuring projects with cutting tools (dies, punches, fussy cutting etc)... we are cut out to be friends!


Welcome to our IDEAS blog hop for December 2022. We have a range of projects from easy and fun for new stampers or more detailed designs for an avid crafter.  

This month we have curated tutorials from 13 international Demonstrators with a 50+ page full color tutorial bundle for you, featuring colorful cards and 3D projects.  You will get 13 detailed tutorials with a range of projects including 13+ cards and 13 3D projects.  The tutorials have detailed instructions in imperial (aka inches!) and metric.


Here is our sneak peek collage for the December IDEAS Tutorial Bundle.  Each photo represents one designer's tutorial in our bundle.

I used the cute Christmas Scotties stamp set and matching punch (I love our punches!). I turned the Christmas Scottie into a valentine.


This card also features "wobblers"... fun little plastic springs that make the Scotties wobble. I have several tips on how to use these wobblers in my tutorial.

All the details, how-to, dimensions and tips are in my tutorial. Lots of photos and diagrams to make it easy to follow along.    A super fun project!  

I hope you like these projects and the projects from my fellow IDEAS demonstrators.  It's really a great bundle of inspiration for crafters or demonstrators looking for new ideas or workshop ideas.  Keep hopping so you can see all the creativity.   The bundle is about 60 pages of detailed full color instructions with 15+ projects and so many tips.

Would you like a copy of the instructions for these projects to use for your personal use, or even to use in your classes? Contact me at MaryKate@MaryKateScott.com Free to customers, or Free to my team members, or $15 by PayPal.  

Once you have received the tutorials, please remember not to share or distribute the printed or electronic copies of these bundles. We have worked hard to provide these exclusive projects for your use. If you know someone that would like to purchase the bundle, please direct them to me to obtain their copy. Thanks for your support.

Thanks for stopping by. Please click on NEXT and visit Caroline in the Netherlands, she's the next talented IDEAS demonstrator.

Happy Hopping! MaryKate


Wednesday, November 30, 2022

Seaside By the Bay a new set coming in January and How to create a sampler

Hello all... my team and I are creating 12 x 12 samplers using the Seaside set - it's a new set with dies and matching paper, embellishments, ribbon and more.

To make a 12 x 12 sampler, we have a host that makes a 6 1/4 x 3 design to set the tone, and then each swapper makes a 3x3.  Terry Dell'Amico is our host and her piece arrived today - stunning.


Here's my 3x3.  I wanted to showcase the designer paper and I love the gold foil. So I added a 2 7/8 square of gold to the 3x3 of Balmy Blue and then created my scene.  

The little sandpiper birds remind me of our beach here on Anna Maria.


Here are my tips on putting together a swap.

First -- make up 1 piece entirely - and make sure you are happy and then, and only then create the next 7 pieces!

I then cut the bases (Balmy 3x3), Gold 2 7/8 x 2 7/8, and then stamped the beach. I love the die that gives me that rough "beach/sand" edge.  Then I stamped and die cut the 3 different birds - it's one stamp to stamp all 3 and one die to die cut all 3.  Then I die cut the sun and the 2 shells.  Here they are, all finished, mostly the same but a bit different.


The paper was a fun challenge. We can only use navy, coastal, balmy and gold, along with crumb cake, so I had to make sure the pink didn't show.

I cut the DSP into 3x3, and then trimmed each piece separately to 2 3/4 x 2 3/4. Below is the whole sheet 6x6 cut into quarters


Above you can see how I trimmed each piece. 

When I get all the pieces I'll put it into a frame and show you the whole look!

Super fun swap sampler to be part of. Join our team and have all the fun with no obligations.  Our holiday party is next Monday (we have one every 3 months, online, so everyone can join in with crafting fun, projects, games, and a bit of silliness!) email me with thoughts or questions MaryKate@MaryKateScott.com

My online store is open and tomorrow Dec 1 there is a clearance refresh, head to the online store early! Don't forget the host code and a present will arrive in the mail to you!


Happy stamping, MaryKate


Monday, November 7, 2022

IDEAS Blog Hop Giving Thanks A book binding explosion card

Hello and welcome to the IDEAS Blog Hop for November 2022 - featuring projects for "giving thanks".


Welcome to our IDEAS blog hop for November 2022. Our theme is Giving Thanks.  We have a range of projects from easy and fun for new stampers or more detailed designs for an avid craftr.  

This month we have curated tutorials from 13 international Demonstrators with a 50+ page full color tutorial bundle for you, featuring colorful cards and 3D projects.  You will get 13 detailed tutorials with a range of projects including 13+ cards and 13 3D projects.  The tutorials have detailed instructions in imperial (aka inches!) and metric.


Here is our sneak peek collage for the November IDEAS Tutorial Bundle.  Each photo represents one designer's tutorial in our bundle.

I used the "A Million Thanks Kit", I love this kit, it is elegant and so easy to put together. For this card I used the stamp set from the kit, the ink from the kit and used "Awash in Beauty" designer paper.

The card is a "book binding card" with an "explosion" on the inside.


All the details, how-to, dimensions and tips are in my tutorial. Lots of photos and diagrams to make it easy to follow along.    A super fun project!  Make it a class by adding in the kit and making up kit cards. 

I hope you like these projects and the projects from my fellow IDEAS demonstrators.  It's really a great bundle of inspiration for crafters or demonstrators looking for new ideas or workshop ideas.  Keep hopping so you can see all the creativity.   The bundle is about 50 pages of detailed full color instructions with 30+ projects.

Would you like a copy of the instructions for these projects to use for your personal use, or even to use in your classes? Contact me at MaryKate@MaryKateScott.com Free to customers, or Free to my team members, or $15 by PayPal.  

Once you have received the tutorials, please remember not to share or distribute the printed or electronic copies of these bundles. We have worked hard to provide these exclusive projects for your use. If you know someone that would like to purchase the bundle, please direct them to me to obtain their copy. Thanks for your support.

Thanks for stopping by. Please click on NEXT and visit Dara in Canada, she's the next talented IDEAS demonstrator.

Happy Hopping! MaryKate


Monday, October 31, 2022

Happy Halloween all - Have a Bewitching Halloween!

My friend Diana made this super cute Halloween card. Can you see that the boots move?  


She used a tiny attachment - a brad - to the top of the boots to create movement. So fun!  


This bundle is sold out, we had a ton of fun with it during our September Online Series, Tuesdays 6-730pm 3 projects, each week for 3 weeks. Next month we are doing the Paper Pumpkin Ho Ho Ho (so sorry kits are sold out). Stay tuned for the December classes, with sign up by November 15.  We are live 6-730pm and it's recorded in case you miss it!


Have a great Halloween!  MaryKate

Wednesday, October 26, 2022

Paper Pumpkin Ho Ho Ho Projects

Wow this month's Paper Pumpkin is a winner! 9 fun Christmas cards.  Our group of fun crafters chose this kit and stamp set for our Tuesday Online Series.  I created 9 extra projects using the stamps, and we'll create 3 projects each Tuesday Nov 1, 8, 15. 


Here are a few of the 9 projects I created: this first card opens to hold a gift card (sorry about the odd pink lighting on the 2nd photo!)


The stamp set includes Santa and the reindeer, love it!


And these "north pole sacks" are fun for treat bags and great as card bases.


Here is a 3 min video showing you this kit and the stamp set (and all the inclusions.  


The refills are available Click here to see the refill

And these treat bags are too. Click here to check out the "north pole sacks"


Feel free to join us. You will need the PP kit. My kits are sold out but you can follow along the tutorial and cut your own kit, just reach out to MaryKate@MaryKateScott.com


We will select our set for Dec next Tuesday, stay tuned. If you'd like the kit and tutorial it is $20 pickup or $30 delivered for 2 classes (less time in December with the holidays).    


Not a Paper Pumpkin subscriber? You can buy a single month, just 3 months, you can subscribe and hit pause anytime... it's a super fun all-inclusive crafting kit.  Click here for Paper Pumpkin details


Let me know if you are interested in Tuesdays 6-730pm online or if you have questions! 

Happy Stamping MaryKate

Monday, October 24, 2022

Make the Cover of the Stampin Up J-D Mini Catalog with Lights Aglow

 I love making the cover of the catalog - our designers really know how to make a card pop!

They also have to design for different markets with different card sizes, so I needed to make small adjustments.  Here's my card and recipe. 


1.The Cover Card with Lights Aglow


Vanilla Base 5 ½ x 8 ¼

DSP (front) 5 ½ x 4 ¼ die cut with the deckled frame

Below the frame 5 ½ x 3 (vanilla/gold background)

Gold sparkle paper 1 x 5 ½

Tree #1 Soft Succulent: stamp and die cut

Tree #2 Evening Evergreen: die cut; Gold glitter paper: die cut

Tree #3 DSP in Soft Succulent

Ribbon about 15”

Vanilla Die cut

Inside 5 ¼ x 4 Vanilla

Glimmer paper for stars on top of the tree

DSP 2 ½ x 6 for vanilla envelope decor


The bow is a double bow (to match the cover) so you simply tie it twice.


I hope you liked my version and found the recipe easy to follow!


Happy stamping, MaryKate

#LightsAglow

Tuesday, October 18, 2022

Quick update - Clearance Refreshed Today

Hi all... just a quick post... the clearance rack was just refreshed, lots of designer paper, specialty paper, embellishments, ribbon.

Click here to see all that is in Clearance

And here's an image with just a few of the many items on sale!


Don't forget the host code so you can get free stuff of your choice, I'll reach out and ask you what you'd like (amount based on your order!), host code is top right of this blog, and here is the current code 4NQCDKCS

Questions? MaryKate@MaryKateScott.com


An easy fold up Star Ornament and Celebrate with Tags bundle

We learned how to create this star ornament at a Stampin Up Convention years ago! Orginally made with 12 x 12 paper the star was wow and huge!  

Today I'm creating it to finish much smaller - about 4" from tip to tip, perfect for your tree.

I'll also share a few other easy projects - these will be part of our November Online series (Tuesdays 6-730pm online live and recorded).  We will use the October Paper Pumpkin for that series.  


First the star ornament

Cut a 4 x 4 square

Fold in half, fold in half again and fold “tip to tip”

Measure 3/4” from each edge (your cutting line)

Cut these 3/4” - can you see the 4 lines below? cut here. 


Fold into the triangles into the center (last photo)

Use a glue dot and bring the triangle edges together

Make 2 stars and then adhere these to stars together (I found glue dots easier than the liquid glue)

With a darning needle add some twine, ribbon or metallic thread and hang on your tree. 


The gift card holder (it's a slider) and the tag were made with this super bundle.  It's right at the back of the catalog and I think it's getting missed! The mittens are so cute.  It's in the online store (see the cart), search "celebrate with tags".


If you have questions, would like info on our Tuesday night series, or these projects, you can reach me on MaryKate@MaryKateScott.com 

happy crafting, MaryKate

Tuesday, October 4, 2022

Free Shipping today - and lots of sweet new products

Free shipping 

is always a winner and such as easy way to save 11% on everything! Stock up on your basics (cardstock, glue) or treat yourself to some new products!


Or maybe something has been sitting on your wish list for a while! Today is the day.  

What do you think of this new Warm Welcome set (above)? I loved all the projects we made at world card making day with this set with matching dies.

If your order is less than $75, feel free to contact me MaryKate@MaryKateScott.com if you are in Maine, and I'll add it to my order tonight at 7pm

The birthday card organizer kit (below) is a winner of a kit! 12 cards plus the organizer... I can't wait to see it in person and I'll share a review

There is a great starter kit offer in October ... the Plus is that you get to add extra things to your totally-customizable starter kit!  You pay $99, you select $155, plus a discount on future purchases, no obligation to sell anything, ever!  Click on the join tab (and read about our lovely community of happy crafters)!  Don't hesitate to reach out with questions


Happy shopping! Happy Free Shipping Day! MaryKate

Monday, October 3, 2022

IDEAS Blog Hop Oct 2022 Christmas Crafting

Hello and welcome to the IDEAS Blog Hop for October 2022 - featuring projects for Christmas


Welcome to our IDEAS blog hop for October 2022. Our theme is Christmas Crafting with cards and 3D projects.  We have a range of projects from easy and fun for new stampers or more detailed designs for an avid craftr.  

This month we have curated tutorials from 13 international Demonstrators with a 50+ page full color tutorial bundle for you, featuring colorful cards and 3D projects.  You will get 13 detailed tutorials with a range of projects including 13+ cards and 13 3D projects.  The tutorials have detailed instructions in imperial (aka inches!) and metric.


Here is our sneak peek collage for the October IDEAS Tutorial Bundle.  Each photo represents one designer's tutorial in our bundle.

I used the Merriest Moments set with a 3D embossing folder (it cuts and embosses).  The box has a lined lid, it's very elegant and holds 2 large chocolate balls to make into hot chocolate.   I also created a card with this set and it's matching embossing folder and dies.


All the details, how-to, dimensions and tips are in my tutorial. Lots of photos and diagrams to make it easy to follow along.    A super fun project or class!

I hope you like these projects and the projects from my fellow IDEAS demonstrators.  It's really a great bundle of inspiration for crafters or demonstrators looking for new ideas or workshop ideas.  Keep hopping so you can see all the creativity.   The bundle is about 50 pages of detailed full color instructions with 30+ projects.

Would you like a copy of the instructions for these projects to use for your personal use, or even to use in your classes? Contact me at MaryKate@MaryKateScott.com Free to customers, or Free to my team members, or $15 by PayPal.  

Once you have received the tutorials, please remember not to share or distribute the printed or electronic copies of these bundles. We have worked hard to provide these exclusive projects for your use. If you know someone that would like to purchase the bundle, please direct them to me to obtain their copy. Thanks for your support.

Thanks for stopping by. Please click on NEXT and visit Caroline in the Netherlands, she's the next talented IDEAS demonstrator.

Happy Hopping! MaryKate


Bewitching Bundle - easy Halloween treat holders

 The Bewitching Bundle is so fun and really makes great treat holders and cards.

These are all Easy Halloween Paper Projects

We created these projects at class.  I don't think they need to much explanation but feel free to reach out to me MaryKate@MaryKateScott.com and request a tutorial, happy to share.

BewitchingBundle


The "Boo" Bag needs a bit of detail on this fold.   Fold on all score lines (all dotted lines) no cutting needed.  Take point B and told to point C to create the diagonal folds.  Keep the squares (A-C) fold and crease free... it's super easy I hope you try it!


Bag is 4 x 8, scored at ¾ on both sides and then at 3 ½ from both ends

White piece for the boots 2 ½ x 2 ½

Scrap for hat and greeting – with a greeting back in starry sky

Small clothes pin

2 oval punch shapes (one in Starry).


Make the bag

Add the boots

Add the greeting


Stamp and color a hat, punch out the hat.

Glue a small clothes pin to the back of the hat (it takes about 20min to dry), I used liquid glue.

These are SO quick and easy that I recommend you make a lot and give them out to lots of people 😊


I really loved creating with this hat and matching punch.  At class we brainstormed ideas to use this hat in red for a Santa hat (with a jingle bell on the end), or as a Pilgram Hat (cut off the pointy top).  I'll share as I create.


Free shipping tomorrow Oct 4th for orders that are $75+. If your order is less, feel free to add to my order. You can reach me on MaryKate@MaryKateScott.com

Don't forget the host code (top right of this blog) for an extra gift from me. Last month, customers received wink of stella or designer paper!


happy crafting, happy Halloween!

MaryKate


#BewitchingBundle

#EasyHalloweenPaperProjects


Thursday, September 29, 2022

Rustic Harvest How to use Autumn or Fall Paper for simple pretty cards

It's fall here in Maine, I love the leaves!  

Rustic Harvest cards along with #SimpleStamping makes card making easy


So I got out my Rustic Harvest paper along with my Charming Sentiments and created a few simple fall cards.  


I think this paper works for a lot of greetings.  I used Charming Sentiments including the matching dies (love how the dies do the fussy cutting for me).  The link (in blue underline) shows you the set with the matching dies... a winner and a time saver!

CharmingSentiments


Adding just a few of the brass butterflies, made these cards pop.  Can you see them... I put them in the flowers, they are small but I loved the white butterfly and wanted to echo this design. 


Rustic Harvest

Here is the full set of designs this paper offers! Most of mine is gone but I'd been saving this last sheet!


Happy creating, Happy Fall - MaryKate


#RusticHarvest

#CharmingSentiments

#FallCards

#BrassButterflies

Monday, September 26, 2022

How to make a Bookmark Card that also fits a Gift Card

How to make a quick handmade Bookmark card

Updated Sept 28 2022 after some great ideas from my lovely team!

I was asked to create a few "bookmark" cards for my library as part of their booth at BayFest on Anna Maria Island FL. My library is the Island branch. I host free classes there, I'd love to see you.

These are fun simple "diagonal pocket cards". This is the "before" photo using the In the Moment stamp set.

bookmark card

In the Moment Stamp Set

Diagonal Pocket Cards


And the after photo... my question to my crafters... the bottom of the cards look "bare" or odd!

Thank you Lynne who said pull out one of the bookmark layers! what a difference. Thank you Diana who suggested just a few loose flowers!!


These go together quickly:  layer the back designer paper cut 4 x 5 1/4 on the 1/4 sheet of cardstock.

Cut the 3 x 4 designer piece into 2 triangles (you'll need 2 of these for matching triangles), make sure you cut each piece into triangles in the opposite direction so you have a right and a left triangle.

Updated Sept 28 after class.. thank you Lori for suggesting I include these photos for the pocket. Step 1: cut 2 pieces 3 x 4 (this will make 2 pockets). Note that each of these pieces are lined up differently. This is how you make the left and right triangle pieces.


You can create a short pocket (like I did for my bookmark cards) or a longer "skinnier" pocket. 


Here I'm showing you why you need 2 pieces of the 4 x 3 designer paper. 
You need a right and a left pocket -- or you can have 2 different patterns (as our paper is 2 sided)

Adhere the pockets down on the very edge of the side and bottom NOT the diagonal, to be sure you can insert the bookmark or gift card

To make the book mark I used the Contour dies, I love these dies so much I'm on my 2nd set!  I cut 2 of the scallopped rectangles. The bookmark image and sentiment is from the In The Moment stamp set. I love these line drawings.  You can click on the words in blue to see these dies and stamps. I punch the 2 rectangles and tied them together with organdy ribbon.

Coloring tips: I used Stampin Up blends, if you look closely the best tip comes from my team mate and friend Diana Michaud... she says leave a bit of white, it will give movement to your images, and I think she's right.  I used the matching in color blends.

Dimenions:

Designer Paper – 3” X 4” for each card cut in half on the diagonal, I used the new in-color paper
Cardstock 4 ¼” X 5 ½” for card back - I used our new In Colors Tahatian Tide and Parakeet Party
At the back is a piece of the in-color designer paper 4 x 5 1/4


Here's a link to a blog post a few years ago with a diagonal pocket card

click to see alternative pocket cards

I'm looking for a little help and inspiration... I think these cards need "something" at the bottom right of the page. Do you agree? Do you think I should add a greeting? add some extra organdy ribbon?  I'd love your 2c and your ideas in the comments.  I'll post an updated project once we all figure this out!!  


If you need paper, stamps, the pretty organdy ribbon... my online store is a click away, just click on the shopping cart.

Don't hesitate to reach out with questions, always here on MaryKate@MaryKateScott.com

Happy stamping, happy reading, MaryKate


#bookmarks

#bookmarkcards

#diagonalpocketcards