Tuesday, December 14, 2021

Pop Up Gift Card Holder Greeting Card with A Christmas to Remember

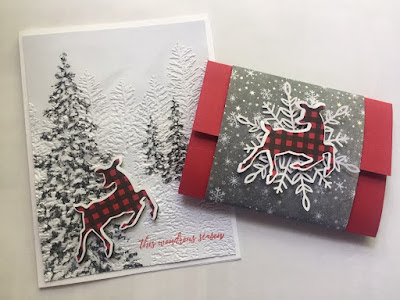
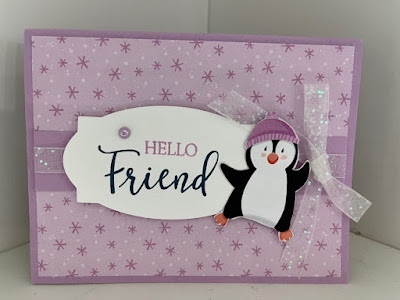
I'll be live tonight at 5pm on Facebook.com/SipCraftCare and will make this card using The Christmas to Remember stamp set and matching paper.  

I'll edit this post with a link to the video.  Here are the dimensions for this version (the sleeve-boxes inside) are always the same.

Here's the link to the video

These are the dimensions for the penguin version 
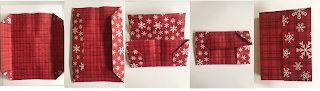


a.   Base 8 ½ x 5 ½

b.   Cardstock Strip 5 ¼ x 1

c.   Designer paper 5 ¼ x 4

d.   Ribbon about 18”

e.   Attach the cardstock strip to the designer paper, add the ribbon

f.    Add the designer paper to the card base.
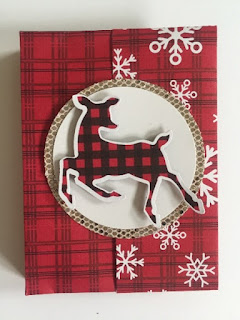
g.   Stamp the greeting, attach to the front of the card, add the penguin, add the bow

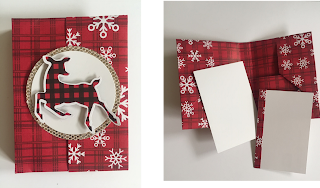
h.   Make the inside of the card
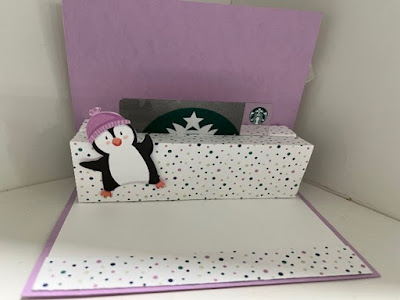


i.    2 “sleeve” boxes:  5 ¼ x 5, on the 5” side score at 1 ½, 2 ¼, 3 ¾, 4 ½

j.    Make the 2 sleeve boxes

k.   Glue the sleeve boxes together on the edges only… so there is room for the gift card

l.    Add a white piece inside 5 ¼ x 4, add a strip of paper at the bottom (1/2 x 5 ¼

m. Add the 2 boxes to the inside of the card, ensuring the edge of the box is up against the card fold.  Glue in place (bottom only of the boxes, close the card).

n.   Glue the side of the box that touches the back of the card base.

o.   Add a penguin if you wish.


If you are looking for Stampin Up products for Christmas... I'd suggest looking through your stash :) or reaching out for a gift card through me (you can reach me on MaryKate@MaryKateScott.com)... as we can't guarantee shipping by Dec 25 anymore!


Happy Holidays! MaryKate


Wednesday, December 8, 2021

Stand up Gift Card using Dashing Deer and Peaceful Cabin Paper

My last post had you ake a 12x12 sheet and cut it 9 x 9” that is 23 x 23cm, if your paper has a direction ensure that the direction if vertical for these score lines.  

Save this 3 x 12 piece and 3 x 9 piece for belly bands for this gift card project.

Here's a link to a quick video on how to create this Real Red Stand Up Gift Card project.  So fast!  


Dimensions:

Real Red Cardstock 4 1/4 x 9 3/4 score at 1 1/2, 4 1/4, 4 3/4, 5 3/4

The video shows you how to take a "notch" from the middle to hold the gift card!

I hope you try it, let me know if you have questions, happy creating, MaryKate


PS Free Shipping today... using the host code will get you great bling!! Thank you for your support!


Gift card holder with the Dashing Deer - Looks like a Book!

Take a 12x12 sheet and cut it 9 x 9” that is 23 x 23cm, if your paper has a direction ensure that the direction if vertical for these score lines.  

Here's a link to a quick video on how to fold up this project.  So fast!


Score at 1 ½, 4 ¼, 4 ¾, 7 ½ turn 90 degrees and score at 2 and 5 3/4

Score at 4, 11,12, 19cm turn 90 degrees and score at 5 and 14cm


Burnish all the score lines.

Turn the 4 corners to the 1 ½ or 4cm score lines

Fold in the paper on the 1 ½ or 4cm score lines

Flip the paper over and fold up the 2 remaining score lines – tucking in the flaps.

Now fold it so it looks like a book.


To decorate: I cut a 2” white circle and a 2 ¼ Dazzling circle and added a punched deer. Inside I will add in a gift card and a note, the note is 2 ¼ x 3 ½ - I’ll decorate this note at the end with left over pieces.


You can close it with Velcro dot, magnets, ribbon (under the circles), or simply fold it shut.

I hope you make one!  I'll post the next gift card holder in 2 min!!


Happy gifting MaryKate


Monday, December 6, 2021

Free Shipping Dec 8 2021 - One Day Only!

 A great time to stock up on gifts for friends, family (or yourself) with Free Shipping Dec 8 2021!


Don't forget the host code (you'll see it on this page top right) and I'll send you a gift of bling as a thank you!!


Questions? MaryKate@MaryKateScott.com


Happy shopping, MaryKate

IDEAS December Blog Hop New Years Resolution Projects

Hello and welcome to the IDEAS Blog Hop for December 2021 - featuring projects using a theme of New Year's Resolutions


Welcome to our IDEAS blog hop for December 2021.  This month we have curated tutorials from 16 international Demonstrators with a 75+ page full color tutorial bundle for you.  This month the theme is New Year's Resolutions.   You will get 16 detailed tutorials with a range of projects including storage, decor, 3D, cards, wine bottle tags, so many fun ideas.  The tutorials have detailed instructions in imperial (aka inches!) and metric.


Here is our sneak peek collage for the December IDEAS Tutorial Bundle.  Each photo represents one designer's tutorial in our bundle.


I made a big box to hold larger and smaller Memories & More cards, along with sections to hold cards and different greetings. How great to have a stash of cards on hand, all ready to send for almost every occasion.  I used the "What a Year" package of cards and I think they are an overlooked product!

And here it is open with the sections.


All the details, how-to, dimensions and tips are in my tutorial. Lots of photos to make it easy to follow along.  

I hope you like these projects and the projects from my fellow IDEAS demonstrators.  It's really a great bundle of inspiration for crafters or demonstrators looking for new ideas or workshop ideas.  Keep hopping so you can see all the creativity.   The bundle is about 65 pages of detailed full color instructions with 25+ projects (cards, 3D, and more!)

Would you like a copy of the instructions for these projects to use for your personal use, or even to use in your classes? Contact me at MaryKate@MaryKateScott.com Free to customers who purchase $35, or Free to my team members, or $15 by PayPal.  

Once you have received the tutorials, please remember not to share or distribute the printed or electronic copies of these bundles. We have worked hard to provide these exclusive projects for your use. If you know someone that would like to purchase the bundle, please direct them to me to obtain their copy. Thanks for your support.

Thanks for stopping by. Please click on NEXT and visit Janey in Idaho in the U the next talented IDEAS demonstrator! 

Happy Hopping! MaryKate


Monday, November 22, 2021

Merriest Frames - Layered Christmas Cards

This is a great set with dies and a hybrid embossing folder (hybrid in that it embosses and cuts in 1 go).


I created several versions in different colors with different leaves including foils, cardstock and the glimmer vellum... do you have a favorite? I'd love to know which is your fave (would you leave a comment?)

If you look closely, I also used different embossing folders on the back layer.. I think I like the musical notes folder, do you have a preference?

I hope you are making lots of holiday cards and enjoying crafting, let me know if I can help with anything!

MaryKate@MaryKateScott.com will reach me quickly.

Happy card making!

MaryKate

Sunday, November 21, 2021

Class 3 the Peaceful Cabin Paper

 And the last in the 3 part series... this class was all about the Peaceful Cabin paper


Project 1 Silver trees – trim as you wish eg 3 7/8 x 5 1/8 and add the Smokey Slate base 4 x 5 1/4

Add the greeting and a silver cord bow.

I’ve attached a silver oval under my greeting.

Options:  Add a piece of the designer paper below the trees e.g., 4 x ½”


Project 2 Slim line card:  7 x 8 ½ folded in half

Tree paper 3 x 8

Smokey Slate 3 ¼ x 8 1/4

Spruce paper 3 3/8 x 8 3/8

Greeting with 10” of organza ribbon.

Envelope décor ¾ x 4


Project 3 The Cabin Card.

Cabin paper 4 1/8 x 2 7/8

Smokey Slate 4 ¼ x 3

Snowflake Paper 4 x 5 1/4

Greeting – left over pieces of white and spruce: ½ x 3 (the spruce is ¼ x 3)


I put the cabin layer on dimensionals.


Project 4 The Bag with the tag

Stamp the greeting attach to the tag 2 x 4

Tie the Spruce ribbon into a knot, trim end, attach the to the tag (ensure the hole can be used to tie the bag shut with twine.)


Happy crafting, tomorrow it's all about the Merriest Frames!  MaryKate


Saturday, November 20, 2021

Class 2 of the Oct 2021 Paper Pumpkin with Peaceful Cabin Paper

Yesterday I posted our Class 1 and here's Class 2 using the Peaceful Cabin paper and the Oct 2021 Holiday Paper Pumpkin Kit


Project 1

Use the other half of the tree base from class 1, trim to 3 ¾ x 5, smokey slate is 4 x 5 1/4

Attach 6” of silver mesh ribbon.

Attach a greeting or a deer to the front. Embellish with rhinestones or the Cabin sparkles. Stamp a greeting inside.  You’ll have left some of the tree paper for envelope décor.  

Project 2 Two gift card holders:

Trim the envelope into 2 (it’s 5 ¾ wide, trim to 2 7/8” wide)

Turn the 2 pieces over and trace the edge of the envelope on the “squared off” side. 

Stamp the inside greetings (the paper is 2 x 4).

Adhere the open side of the half envelope.

If you wish, decorate the front of the envelopes with silver cord under the greeting.


Project 3: You can use the designer paper (Artistic) or a piece of the plaid paper. You can attach vellum trees (or the Noel) and a greeting. And or a punched deer.


Don't forget to subscribe to Paper Pumpkin by the 10th of the month! I think we have some great kits coming and I'll be posting extra projects here.


Happy creating, MaryKate

Friday, November 19, 2021

Peaceful Cabin meets our Holiday Paper Pumpkin

We have had fun creating projects with our Paper Pumpkin October kit. I thought I'd share some of our projects from these classes with the instructions.  We loved the kit as is, but enjoyed stretching it to make more projects


Here is class 1


Projects 1 and 2: We will make 2 cards as the kit shows us.


For Projects 3 and 4 cut the tree base into 2 cards and cut a spruce base into 2 cards


Project 3 Tree card

Cut the tree card 3 ¼ x 5 ¼

Cut the Spruce base 3 3/8 x 5 3/8

Cut a 2nd piece of spruce ¾ x 5 3/8


Trim the front right of the card ¾ (so the front is smaller)

The snowflake piece is 5 ¼ x 5/8


Layer the front pieces, the side pieces and add a greeting with 10” of organza ribbon.


Project 4

Use the 2nd spruce base, trim to 3 ¾ x 5 (keep the leftover piece of spruce)

Use the vellum tree piece as a stencil and sponge on the trees (you’ll do this twice)

Stamp snowflakes

Attach the silver mesh ribbon, folded in half. Add the greeting.

Attach this front piece to the silver foil 4 x 5 1/4


Project 5 Bottle Tag: stamp the 2x4 white piece with the trees and a greeting. Attach the silver ring. Tag is 2 ½ x 7, scored at 2 3/4.  I like the rounded corners, hope you do too!


I'll share classes 2 and 3 later this week, happy Stamping MaryKate


Monday, November 1, 2021

Nov 2021 IDEAS Blog Hop with Punch Project Tutorials

 Hello and welcome to the IDEAS Blog Hop for November 2021 - featuring projects using our Punches!


Welcome to our IDEAS blog hop for November 2021.  This month we have curated tutorials from 15 international Demonstrators with a 60+ page full color tutorial bundle for you.  This month the theme is Punch it Up.   You will get 15 detailed tutorials with a range of projects.  The tutorials have detailed instructions in imperial (aka inches!) and metric.


Here is our sneak peek collage for the November IDEAS Tutorial Bundle.  Each photo represents one designer's tutorial in our bundle.


I made a window card with an ornament. This tree punch is an "oldie but a goodie" punch and is perfect for card making, 3D, tags, and more!

All the details, how-to, dimensions and tips are in my tutorial. Lots of photos to make it easy to follow along.  

I hope you like these projects and the projects from my fellow IDEAS demonstrators.  It's really a great bundle of inspiration for crafters or demonstrators looking for new ideas or workshop ideas.  Keep hopping so you can see all the creativity.   The bundle is about 65 pages of detailed full color instructions with 25+ projects (cards, 3D, and more!)

Would you like a copy of the instructions for these projects to use for your personal use, or even to use in your classes? Contact me at MaryKate@MaryKateScott.com Free to customers who purchase $35, or Free to my team members, or $15 by PayPal.  

Once you have received the tutorials, please remember not to share or distribute the printed or electronic copies of these bundles. We have worked hard to provide these exclusive projects for your use. If you know someone that would like to purchase the bundle, please direct them to me to obtain their copy. Thanks for your support.

Thanks for stopping by. Please click on NEXT and visit Odette in Australia the next talented IDEAS demonstrator! 

Happy Hopping! MaryKate


Wednesday, October 20, 2021

Stamp Sale - today only - Cling Stamps are 15% off

 Hi all... late breaking news... Cling (rubber) stamps are 15% off today only Oct 20 2021


I'll include some images below of the stamps - but it's pretty easy to head to the Stampin Store and it is easy to see and sort through the sale options.

Click here to get to my store


My favorites are

What's Cookin'

Artistically Inked

Many Messages


What are yours?


Happy shopping MaryKate

Tuesday, October 5, 2021

Clearance Refresh Oct 6 -shop early for deals

 Hi all.. a quick post, the clearance rack will refresh tomorrow early!


I love our products.. and love them even more when they are on sale! Click on the cart, click clearance and then if you love a bargain, sort "price low to high"


Also launching tomorrow is our Tag Kit - 12 cute tags that are larger tags.  I will host a class making 4 tags, 4 tags with matching bags and 4 full size cards, you can do this online or in person.  You can purchase your own tag kit and then by using my host code, send $5 for the 2nd class of 4 cards with envelopes.  It will come right to your mailbox!  

Click here for a short video to show you the tag kit

Click here to see the detailed instructions for the tag kit - so you know what you get!


And here is the imagery of the kits!


What do you think?  I think they are super cute.  They are larger so they are perfect for a card front!.

My host code is top right and a gift from me comes as a thank you - right to your mailbox. It differs but is usually pretty bling, or an embossing folder. 

Happy shopping in the clearance sale - and with our fun tags kit!  Happy stamping, MaryKate


Monday, October 4, 2021

Oct 2021 IDEAS Blog Hop with Family Celebrations Tutorials

Hello and welcome to the IDEAS Blog Hop for October 2021 - featuring projects for on Family Celebrations!


Welcome to our IDEAS blog hop for October 2021.  This month we have curated tutorials from 10 international Demonstrators with a 50+ page full color tutorial bundle for you.  This month the theme is Family Celebrations (from Christmas to Thanksgiving to Halloween and New Babies -- and more!).  You'll want to make them all.  You will get 10 detailed tutorials with a range of projects.  The tutorials have detailed instructions in imperial (aka inches!) and metric.


Here is our sneak peek collage for the October IDEAS Tutorial Bundle.  Each photo represents one designer's tutorial in our bundle.


I made a gingerbread village, and several cards.  One suite of cards is a one-sheet-wonder from z 6 x 6.  This Gingerbread Suite is a must-have this season.   Be sure to add the White Velvet paper (for the icing on the cookies) and the adhesive sheets to your shopping cart to make it easy to make the cookies.  Brushing on a bit of Early Espresso make the cookies and the house look "baked".   Drop back tomorrow and see other cards made with these gingerbread "cookies" or biscuits for our UK and Aussie demos!


At class I included a gingerbread man cookie (a real one!).  You easily create a fun afternoon at home with friends, children, grandchildren with this tutorial!  All 1 color cardstock (Cinnamon Cider), and 1 ink (dark brown, I used Expresso).    

All the details, how-to, dimensions and tips are in my tutorial. Lots of photos to make it easy to follow along.  And I included a few extra projects.

I hope you like these projects and the projects from my fellow IDEAS demonstrators.  It's really a great bundle of inspiration for crafters or demonstrators looking for new ideas or workshop ideas.  Keep hopping so you can see all the creativity.   The bundle is about 55 pages of detailed full color instructions with 15+ projects (cards, 3D, and more!)

Would you like a copy of the instructions for these projects to use for your personal use, or even to use in your classes? Contact me at MaryKate@MaryKateScott.com Free to customers who purchase $35, or Free to my team members, or $15 by PayPal.  

Once you have received the tutorials, please remember not to share or distribute the printed or electronic copies of these bundles. We have worked hard to provide these exclusive projects for your use. If you know someone that would like to purchase the bundle, please direct them to me to obtain their copy. Thanks for your support.

Thanks for stopping by. Please click on NEXT and visit Elizabeth in Alberta Canada the next talented IDEAS demonstrator! 

Happy Hopping! MaryKate


Saturday, October 2, 2021

Christmas Whimsey Kit - a Merriest Frames Elf

We had a party today for World Card Making Day and made the Christmas Kit - along with some Gingerbread cards and houses.


Many of us used just 1 die cut on the horizontal Christmas card, and so used this extra elf along with the Merriest Frames Bundle.


Dimensions

Base 8 1/2 x 5 1/2

Crumb Cake layer 4 x 5 1/4

Merriest frame from Soft Succulent

Cherry Cobbler (below the crumb cake) 5 1/2  3


This merriest frames bundle is a lot of fun. We are using this set Tues Oct 5 at class (3 spaces left, RSVP MaryKate@MaryKateScott.com) or join me Wed Oct 6 on Facebook.com/SipCraftCare with a demonstration of this hybrid bundle and several cards.


Happy World Card Making Day!

MaryKate

Friday, September 24, 2021

Beauty of the Earth Fall Card with paper suede ribbon

I love these fall colors.


This is a simple card but I think could be a hello, maybe a sympathy card, a thinking of you.  What I like a lot is the "paper ribbon" under the greeting.  Tips below on this "ribbon"!


Dimensions

Base 8 ½ x 5 ½ Early Espresso

Wood layer 5 3/8 x 4 1/8

Merlot 5 x 3 ¾

Designer paper 4 7/8 x 3 7/8


Layer the card front. Put these layers on the base with dimensionals

Stamp the greeting and die cut with a label (e.g., tasteful labels, Christmas season labels) or trim with scissors


To make the “suede” ribbon, work ¼ strips of merlot with a bone folder (as if you were making curled ribbon), keep working it back and forth. After 2-3 min you’ll be able to separate the paper into 2 thin layers.  Use these paper ribbons below your greeting.


Add gems – I used the gold shimmer dots.


Add a white card inside 4 x 5 ¼ and add a ½” strip of the designer paper. 


The designer paper will easily make 6 of these cards from 1 sheet – stunning – and quick and easy!


Thanks to Brian King for this layout with the borders.


Happy Stamping all ... and if you need any supplies, first check your stash (I know you have stuff!) and then order just what you need, by clicking on the shopping cart (top right). Adding the host code will get you a nice gift in the mail from me!


thank you - MaryKate


Wednesday, September 22, 2021

Welcoming Woods - Fall card with a panel layout

I love this cute, peaceful set in the Mini Catalog. 

Hello Friend Fall card dimensions


Base card 8 ½ x 5 ½

Back layer: White 5 ¼ x 4 – stamp the greeting then emboss with the timber folder

Front layer will end up 2 ¾ x 4 (you can start larger, blend then cut if you wish)


Put on a post-it note on the bottom and then work a few colors to create the sunset look with Crushed Curry, Cajan, Navy (lighter), Navy (darker)

Remove the post it note and blend Soft Suede (lighter brown)

Now stamp the trees.

Stamp the bottom edge (between the trees), tip:  the stamp has the curved side to the bottom like a smile!  Thank you Angel for this great tip :)


Now create the panels. 

Cut off 1” from the right side

Cut off 1 ¼ from the top (left) and the bottom (right)

Add to the white embossed card.

Add an embellishment.

Stamp inside

Decorate your envelope by embossing the flap of the envelope.


This card was inspired by Amy Koenders who makes gorgeous projects!


Happy Fall Y'all!  MaryKate


PS .. just a few days left for Sale-A-Bration (spend $50 in my online store and choose a free item!) and Just a few days left to join my team with the offer of a FREE stamp/die bundle or stamp/punch bundle!! email me with questions - MaryKate@MaryKateScott.com

Friday, September 17, 2021

Flowers of Friendship pretty thank you card with matching punch


Sometimes I get so caught up with the Holiday seasons (Fall, Thanksgiving, Halloween, Christmas) I miss the fun simple sets like the Flowers of Friendship in the annual catalog.


Here's a cute card, from my friend Ginny Ek using this great stamp/punch set.  The designer paper is "hand-penned" and the flowers are colored with the fabulous Blends (alcohol markers).  Gems are part of our new in-color collection.


Enjoy!


Happy crafting MaryKate

Thursday, September 16, 2021

Penguin Place Fun-Fold Card and Gift Card Holder

 Hi crafters


I created a quick video for you to show you how to make this fun fold card and gift card holder. I love that both of these are interactive. The gift card pops open and the fun fold flips open.


click here for the short video


Click here for the short video


Fun Fold card dimensions

Base 5 1/2 x 4 1/4

Designer Paper 12 x 5 1/4 score at 1 3/4, 4 3/4, 7 3/4

White inside piece is 5 x 2 3/4

The ribbon is the organza

The punch is called Lovely punch


Gift card holder dimensions

Base 4 1/4 x 10 3/4 score at 3 1/4, 8 1/2

Designer paper (front) 2 3/4 x 3 3/4 and the layer is  3 x 4

The "tree" designer paper is 4 x 2 

The penguin is hand cut from the paper


I love this free paper - it's part of the SAB offer (spend $50 and choose an item - including this paper)


Happy crafting! MaryKate