I love helping people get more out of stamp sets they own.
Here's a few Valentine's Day card ideas from sets that were very popular in the past few years.
Sheltering Tree has a lot of fun sayings and images. Great to make the tree "bloom" by adding a stamp with markers or dots. And the Hot Air Balloon set that was so popular. Here's a simple "love is in the air". This paper is from the Magical set - but you could create your own designer paper with the cloud stamp.
I hope you look through ALL your sets and get creative with making Valentines! Happy Valentine Stamping! MaryKate PS Don't forget the host code, and it's Sale-A-Bration time so for every $50 you spend you choose a free item.
One of the great things about teaching is you learn how others learn!!
We made these at class yesterday and a few people said... it would be great to have a photo with all the pieces cut off!! Here it is!! On the left with pieces cut out, then the right you punch out the opening with the Modern Label Punch (or we found out last night - the "I" die if you have the alphabet!) We all agreed this one is fun fast and easy - see yesterday's post for all the how-to! Happy crafting Don't forget, this Bubble & Fizz paper is free with a $50 order!
At class last week one of our crafters was talking
about making this box. So I thought, why
not redo it with the pretty new Bubble and Fizz paper with the hearts? This paper is part of Sale-A-Bration, and is a free item (12 sheets of designer paper) with a $50 order.
It’s Calypso Coral and I think it’s
really pretty.
Super easy and great to make if you want
to make one for everyone (you know I love my bankers, my snow plow guy, my post
office workers, town office, doctor’s office… ) I think it’s fun to give out
Valentine’s and make someone smile.
Here's the open version - the heart is the closure.
And there's room inside to write a note (or on the back)
It's also very "paper efficient" as you get 3 from each piece of 8 1/2 x 11 cardstock.
Here’s the original post with detailed
instructions and all dimensions.
The
Perennial Birthday Kit is a winner! We are playing with this set Monday Jan 29 at Warsaw 6pm, I have 1 place left, so RSVP quick!
You
will each
make 2
of the
4 cards
from the
kit. Easy to put together and I think these cards have a fun wow factor.
One person at class will win the pretty box and the box inserts.
Here's a quick video so you can see the kit.
We will also make our own designer paper and create a card in a treat bag.
Create
your own DSP with the same Perennial Birthday set
I’ve
cut the
pieces 9
x 6 ½ so you have a bit extra. Stamp in basic grey, all the flowers, turning
the stamp so there’s a more random pattern.
With
the dauber, tap it to the ink pad 2-3 taps, then run the dauber on your grid
paper to take off excess color, then gently swipe it on your flowers. I’m using Calypso Coral and either Wild
Wasabi or Pear Pizzazz
Then
cut out the treat bag with the big shot.
Fold up, adhere.
Make
the card back 3 ¼ x 4 ¾ and the whisper white 3 x 4 ½, stamp the “today blooms
just for you” in grey.
Now make the
belly band, it’s 1” wide and about 8 ½, wrap it around the treat bag, secure. Wrap thin white twine (about 18”) and make a
bow. Stamp the small flower and with the
dauber color in the flower and leaves.
Punch
the flower out with the 1 1/8” scallop punch and then punch out the matching
Calypso Coral 1 3/8” scallop circle.
Adhere together, then add to the
band with a dimensions.
Here's a set of cards made with the same stamp set - I love the versatility of this set.
I’m
using the free Tutti
Fruitti
cards (free with Sale-A-Bration) with the Perennial birthday stamp set.
Ink is basic grey and the ribbon is also from Sale-A-Bration
and is also free with a $50 order.
I
like the variation in the cards (email me for an instruction set) and I like a
little sparkle.
Not
everyone love sparkle so here’s the So Saffron card without sparkle, which do
you prefer?
1 place left for Monday so email me MaryKate@MaryKateScott.com for that spot.
My team challenge was to copy a card in the catalog - but use a different stamp set and colors.
My inspiration was the coffee set on page 31 - my favorite from the annual catalog. I love the square 4x4 gift card holder to the left of the picture. I love the coffee bean stamp and the matching ribbon. So here's my Apron of Love with a Dunkin Donuts gift card. The Apron of Love set has the heart and I thought it made a fun pattern and I'm in "Valentine mode"! What do you think? My goal was also to make a card that a beginner could make as I'll be crafting at Dunkin Donuts. I thought this was pretty easy. You stamp hearts (and a greeting inside) then make a holder (it's 3 1/4 x 4, scored 1/2 on each of the the short side and 3/4 on 1 end of the long side), attach to card, stamp the pocket, cut out the apron, strings, pocket. I got the logo online.
Add caption
The ribbon is the lovely Berry Burst silver edge and I tied it with the twine.
Do you think it will be easy to make? I thought so. I'd be interested to hear what you think! Is it cute? Easy for a beginner? Happy stamping (and happy copying the catalog!) MaryKate
It’s
a snow day! Even though I still have to
work on a snow day, I still share in the fun when I get the news from kids and
teacher-friends!
So I
thought I’d make snow day projects!
Quick cards
using Memories
and More
– I just
copied the catalog, why not make it easy – so much inspiration! These cards are called "color theory".
Then
I created
another
one and
to make
the snow,
I splattered
on some
glue. You put a small squirt (1/2 tsp) of
glue in a small pot, 1 tsp of water, mix and then dip your aquapainter
in the gluey mixture, tap the brush so it splatters a fine mist of watery glue,
then sprinkle on dazzling diamonds.
Snow!
The
next is a Memories and More book (or a start on a book). So easy, and so simple.
My friend missed
craft class as her (super-cute) grandson and she played in the snow with him (so glad she did, these are priceless days). So I
thought I’d grab a few of the Memories & More snowy cards and create some pages.
I’ll
finish the book and she can do the journaling.
This would be a fun gift for a parent or grandparent (or friend who you
travel with ).
Quick
and easy… just a fun lunchtime crafting escape for me. Now back to work … no
snow day for me :(
I
have so many ideas for this card… so cute with baking tools, or BBQ tools. What
about in Orange with a Home Depot logo and a gift card?Or in Berry Burst with a Dunkin Donuts gift
card inside??
This
was made as a swap card.
Each
person on
my team
signs up to make 12 identical cards and
sends them
out and
gets 12 card ideas back. I just got all my swaps in and can’t wait to
show you what I received.
I’ll
start with mine – the Apron
Card with
the Picture
Perfect
Birthday
designer
paper (of
the left),
and the sequin dry embossing on the white cardstock. I added the scissors and new silver
twine. The dies are cute and very easy
to use.
I’ll
organize all my swaps and post them all week – my team is so creative, you will
love their ideas!
I just love it. It has some great design
elements that make it really pop.
Janey used the Sure Do Love You set with the matching framelits Lots to Love Box for the heart cut outs. She also used the new sequin embossing
folder. Do you see the sequins on the
Flirty Flamingo background?
There’s a tiny bit of silver
glimmer paper behind the heart and this is pulled out with the trim which is
also silver (the silver sequins), and Flirty Flamingo twine.
A little bit of coordinating washi
tape also in Flirty Flamingo really sets this off.
I think she did a stunning job and
pulling the colors and patterns together.
She
and I both say it’s what we love most about Stampin Up products, they coordinate, so your
results will be wow and crafting is so much easier.
Love this card. I think I might create something like this in Charlie’s favorite colors – that for my “one and only” Valentine (see
yesterdays post on Valentine philosophies!)
See more of Janey's work at http://www.inspiredstamping.com/
Happy stamping, MaryKate
PS This bundle (dies and stamps) is $48.50 and if you add a $1.50 item you can choose a Sale-A-Bration item for free!!
I find people have 2 very different philosophies on Valentine's Day... either you make (or buy or send) just 1 card to that 1 special person.... OR ... you make a lot of Valentine's and share the love!
I'm the latter. I think Valentine's Day is a great time to say how much we "love" our hairdresser, mail carrier, town office, doctor's office (yes even the person that draws my blood -aggh!), the post office manager (I live in a very small town)! I usually create treat packaging but this year I think I'll create "narrow cards" these are 20 to a pack for only $8 and include envelopes and I'll stamp with the cute Panda. I'll probably put in a little twix bar or other treat. So the card on the right is the narrow and on the left is the usual notecard 3 1/2 x 5 - $6 for 20 with envelopes. Which size do you like better? Anyway... So I usually create treat packaging and I've included a few links here to get your creative Valentine's Day juices going... such as the nugget holder http://www.sipcraftcare.com/2018/01/painted-with-love-nugget-holder.html or the matchbook http://www.sipcraftcare.com/2017/01/m-matchbook-live-video-with-sending-love.html or the love you pinch box http://www.sipcraftcare.com/2018/01/magical-day-friends-for-jan-20.html Just search "valentine" in the search box top right hand part of this screen and there are lots of quick fun easy packages. Happy Valentine crafting - MaryKate PS Don't forget the host code with your purchase to get a free goodie from me at the end of the month. And it's Sale-A-Bration, so for every $50 you spend, you chose an item. email me if you have questions MaryKate@MaryKateScott.com
Here's the video - click for a 3 min "crafty" escape. Don't forget if you buy a 3 month subscription for $55 you get to choose a Sale-A-Bration item. I think you are really going to love this one. I'll bring some with me to class to put together. The ribbon is rose-gold trim and the cards open to look like a heart. Fun stamps for Valentines Day. $20 a month, no contract. Refill kits (no stamps, no ink) are $8. Happy crafting, MaryKate
This
love card uses the Painted with Love paper, and 8 hearts cut from the Sassy framelits,
in 3 different sizes. You just layer
them on the side and you are done.
The
card is a regular sized 8 ½ x 5 ½ folded in half, with t he front of the card
trimmed to 3” (so just cut off 1 ¼”).
This way
you can
see the powder
pink behind the hearts.
The
outside ‘love’ is from sunshine wishes and the inside ‘you’ is from the free
“Celebrate Amazing You” in the Sale-A-Bration
catalog.
I
added a gold heart at the top to tie it together.
The
narrow card (new to the Spring catalog) is 4 ½ x 2 1/2.
So I covered the card
with matching card stock (this one is Melon Mambo). Then added the 4 1/4 x 2 1/4 Painted Love paper, added the gold thread to
the back of the hearts and then added ‘love’.
This die is from the Lovely Words set.
Hi crafters - a few more details on Sat Jan 20 class in Hartland. We will play with both the Pandas and the Magical Day Friends sets on Saturday. Here's a bit more on these magical friends. The first card is a notecard (3 1/2 x 5) and you stamp 1 of the friends and color it in. You can use the new Stampin Blends or the watercolor pencils. Lots of paper choices. I used a page from the matching designer paper. The You are One of a Kind is in Bermuda Bay and there's a matching die to cut this out -and dies for the friends. Do you like the glimmer paper? It comes in blue, green or this white glimmer. I used the star punch. I think the 1 3/4 or 2 or 2 1/4 all are fine too. This card uses embossing. So after I colored the wizard and cut him out, I embossed the silver stars and then colored in with the new lemon-lime watercolor pencil and used my blender pen. The lemon-lime sheet below the whisper white was what I used to stamp and embossing the Magical greeting (it's hidden behind the white). And I had to put some wink of stella in his beard :) This would be fun with the mermaid and some bubbles -- or maybe the dragon or the unicorn could breath some sparkles!
This is a tiny "pinch box". It's 3 x 6, then on the long side, score it 1/2" from the end, then take the 5 1/2 and divide into 4 equal panels, so score at 1 3/8, 2 3/4, 4 1/8 then 1" on the short edge. cut the 4 edges, remove the tab that is 1/2 x 1 and fold into a box. Pinch it shut and then close with a binder clip. We'll be doing several other closures at class and I'll post all the different ways we do this on Monday. I think I might make some in the Painted with Love paper for a Valentine look. More on the Panda's tomorrow. Happy Crafting and if you are local, don't forget to RSVP for class Jan 20 - MaryKate
This is a bit of a rushed post, very busy day here and football about to start but I promised to show you what we are making Sat Jan 20 2-4pm at the Hartland library. A RSVP is essential by Thursday Jan 18 latest! I'll post details of these projects tomorrow.. but lots of sparkle, magic, wink of Stella, Panda love and chocolate! Many color choices (I went a bit mad on Rich Razzleberry!!) The larger Panda card we made about 3 years ago (before my blog started), it's a super easy gift card holder that I covered with Panda's (I think when we did it before I covered with "Mingle All the Way"), I love it when something fun gets a new look with new stamps and paper! The panda idea was from Dawn Griffith and I think the gift card holder card design was Brandy Cox (but it was a while back!) More tomorrow - Happy crafting, MaryKate
Thank you for all the lovely comments on the Picture Perfect Birthday projects on yesterdays post (just scroll down to see the projects!) I love that you love the set and these projects. Thank you!
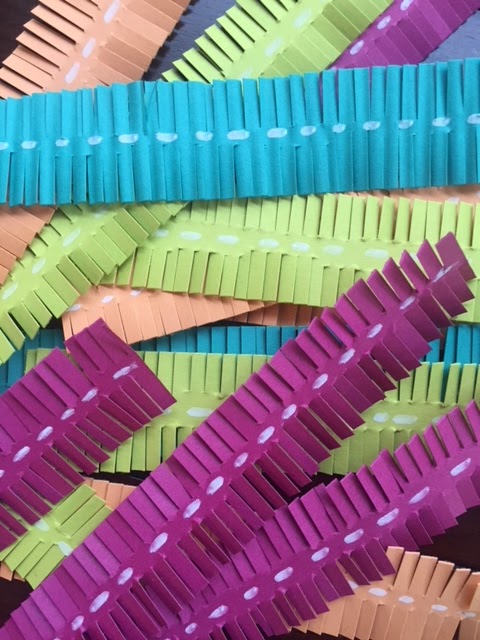
I've put a new class on the schedule Sat Feb 24 2-4pm where you will get the stamp set, the inks (to take home) and all supplies to make the projects which all the leftover pieces to take home. See "workshops and events" tab for all the details. I also promised to share my "how-to" on the fringe. In the catalog you'll see they are offering rolls of paper fringe but a) they have withdrawn it and b) why not make it ourselves?
There are 2 ways - I cut strips 1" wide, then with a chalk marker (a gel pen works fine too or the white pencil in the watercolor pencil set) draw the stitching down the center. Cut with fringe scissors if you have them to make it fast or regular scissors. Love it! This weekend I'm going to make some with the sewing machine and we'll decided which we prefer. I'll bring in samples of these projects to our classes so you have a good look! See you at class or online, happy stamping, MaryKate
This set is wow, I think it's THE SET of the new catalog. Love the designer paper, cute patterns on the back, fun photos on the front. We all need birthday cards and this set makes birthday cards for just about every person on your list.
So I went a little crazy and created this set of cards - what do you think?
I also created a box to hold a narrow card (these are new, they are 4 1/2 x 2 1/2 and the packet includes 20 cards and 20 envelopes for $8) along with a gift. You could buy the dies from Sure Do Love You which has a box making die (but I have not yet bought this... emphasis on "yet")! I love quick and easy treat packaging, great for birthday parties and for Valentine's Day. So I did a sour cream package and a Ghiradelli chocolate holder - love the matching ribbon in Berry Burst.
And some cards match the treats! I'll post more details on the cards tomorrow. Some cards have greetings inside. It's such a versatile set as you can use this for birthdays but also celebrations as well.
Tomorrow I'll post a class - where you get the stamps, the inks, the embellishments, all the cardstock you need, everything...so you can make these 14 items, decorate your envelopes and have lots left over to make other cards.
The set is on page 5 of the new catalog (see tab on catalogs, or email me MaryKate@MaryKateScott.com to get a catalog). Class is Sat Feb 24 2-4pm in Hartland and then ONLINE with a Facebook Live Feb 25. More to come on Picture Perfect Birthday, happy crafting, MaryKate


