
For
those of you who love to get ahead with your
holiday cards, Stampin
Up has “early released” this set. It’s
lovely!

Above is my swap and tomorrow I’ll post a host of stunning swaps
I received from my Y Knot Stamp Everything.

When
I participate in swaps I love to see different ideas, new uses of color, ribbon
and embellishments. So I try not to turn
to the “usual” (so red, green and white for Christmas).
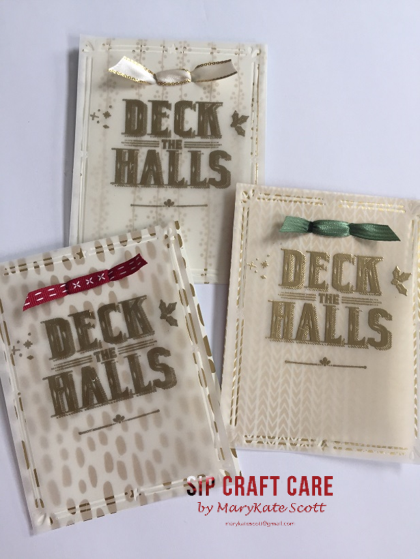
 I
thought I’d use Very Vanilla with vellum and gold. I love the luxe look, and if you can’t “bling
out” at Christmas when can you bling out!?!
And as part of the paper share I offered with the new catalog I ended up
with this “baby paper” called “Bundle of Love” (to the right)… and truly I have no use for this... no upcoming baby showers for me. However the other side is gold … so
this was my inspiration!
I
thought I’d use Very Vanilla with vellum and gold. I love the luxe look, and if you can’t “bling
out” at Christmas when can you bling out!?!
And as part of the paper share I offered with the new catalog I ended up
with this “baby paper” called “Bundle of Love” (to the right)… and truly I have no use for this... no upcoming baby showers for me. However the other side is gold … so
this was my inspiration!
This
Carols of Christmas set has a great set of dies that are called card builders.
So I took the die set and made the edge on the vellum. Then I embossed with
gold using the big greeting.

I
attached the vellum to the Bundle of Love paper with a faux (fake) bow.
Cut
your ribbon about 8” (you’ll trim it down later). Punch 2 holes in the front of your card.

Thread
the ribbon from the front to the back.
So both ends are poking out the back.

Now take the ribbon on the right and poke it through the hole on the
left. Do the same for the
left ribbon.

Now both ends are sticking out the front. Easy peasy
and looks fancy!

Trim
the ends of your ribbon, you’ll find they fray a bit as you are poking and
pulling.
I
have no idea why the photos turned out a bit pink and blue… it was like the
paper was haunting me J
I
love the gold metallic ribbon – however
Garden Green Striped Ribbon and the Cherry Cobbler Cross Stitched Ribbon look
nice too. Do you have a favorite?
 Don’t
forget our cardstock goes beautifully into your printer (ink jet or laser) and
you can see here for my swap I turned the card into an invitation. The tree is part of the die set. I’ve left room in the invitation for a
personal note.
Don’t
forget our cardstock goes beautifully into your printer (ink jet or laser) and
you can see here for my swap I turned the card into an invitation. The tree is part of the die set. I’ve left room in the invitation for a
personal note.
Here’s
a great video on the set so you can see how all the dies work.
Let
me know what you think! Thank you for shopping in my online store - our profits are going to new school projects for the fall of 2017. We appreciate your support.
Happy
stamping MaryKate
No comments:
Post a Comment