
How to make a quick handmade Bookmark card
Updated Sept 28 2022 after some great ideas from my lovely team!
I was asked to create a few "bookmark" cards for my library as part of their booth at BayFest on Anna Maria Island FL. My library is the Island branch. I host free classes there, I'd love to see you.
These are fun simple "diagonal pocket cards". This is the "before" photo using the In the Moment stamp set.


And the after photo... my question to my crafters... the bottom of the cards look "bare" or odd!


These go together quickly: layer the back designer paper cut 4 x 5 1/4 on the 1/4 sheet of cardstock.
Cut the 3 x 4 designer piece into 2 triangles (you'll need 2 of these for matching triangles), make sure you cut each piece into triangles in the opposite direction so you have a right and a left triangle.
Updated Sept 28 after class.. thank you Lori for suggesting I include these photos for the pocket. Step 1: cut 2 pieces 3 x 4 (this will make 2 pockets). Note that each of these pieces are lined up differently. This is how you make the left and right triangle pieces.

You can create a short pocket (like I did for my bookmark cards) or a longer "skinnier" pocket.


Adhere the pockets down on the very edge of the side and bottom NOT the diagonal, to be sure you can insert the bookmark or gift card
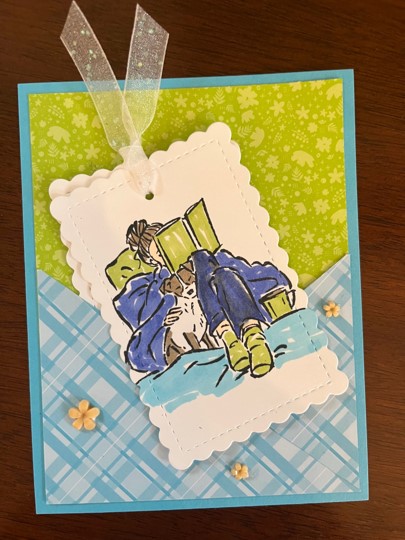
To make the book mark I used the Contour dies, I love these dies so much I'm on my 2nd set! I cut 2 of the scallopped rectangles. The bookmark image and sentiment is from the In The Moment stamp set. I love these line drawings. You can click on the words in blue to see these dies and stamps. I punch the 2 rectangles and tied them together with organdy ribbon.
Coloring tips: I used Stampin Up blends, if you look closely the best tip comes from my team mate and friend Diana Michaud... she says leave a bit of white, it will give movement to your images, and I think she's right. I used the matching in color blends.
Dimenions:
click to see alternative pocket cards
I'm looking for a little help and inspiration... I think these cards need "something" at the bottom right of the page. Do you agree? Do you think I should add a greeting? add some extra organdy ribbon? I'd love your 2c and your ideas in the comments. I'll post an updated project once we all figure this out!!
If you need paper, stamps, the pretty organdy ribbon... my online store is a click away, just click on the shopping cart.
Don't hesitate to reach out with questions, always here on MaryKate@MaryKateScott.com
Happy stamping, happy reading, MaryKate
#bookmarks
#bookmarkcards
#diagonalpocketcards
No comments:
Post a Comment